3D Print Finishing Explained – How to Fill, Paint & More
At 3DSourced we’ve covered everything 3D printing and 3D since 2017. Our team has interviewed the most innovative 3D printing experts, tested and reviewed more than 20 of the most popular 3D printers and 3D scanners to give our honest recommendations, and written more than 500 3D printing guides over the last 5 years.
Whether you’re printing for business or want to rescue a not-quite-perfect print, this guide will explain step-by-step how to smooth out your 3D prints the right way with the best 3D print finishing methods.
Finishing is the post-printing process of smoothing the surface of a printed object so that it looks as perfect as possible.
Because every print material requires slightly different finishing techniques, we’re going to look at each method in turn to match the right one for your project and skill level.
We’ll explore the best design techniques, slicer settings, materials, and finishing methods that will all contribute to the professional look of your 3D-printed object.

How to Finish 3D Prints: Basic Principles
On the subject of printing practices, one of the best ways to minimize the amount of finishing work cleaning up 3D prints is by starting at the very beginning of the printing process.
Layer Height
Your slicer settings have a lot to do with how your finished object looks – particularly layer height.
Layer height is the setting that establishes the height of each layer of filament in your print. In some sense, layer height in 3D printing is akin to resolution in photography or videography.
When you choose a thicker layer height, your object will have less fine detail and the layers will be more viable. When you choose a thinner layer height, a higher level of detail is possible and your layers will tend to blend into one another.
If you’re intending on painting 3D printed parts after you’ve finished printing, it may be best to use a lower layer height. You’ll spend more time printing, but less time sanding 3D printed parts before painting them. Read on to learn more about painting PLA and other 3D materials.
Print Speed
Print speed is another important setting that can contribute to overall object quality. Print speed is how fast the print head travels while extruding filament. Therefore, optimal speed depends on the object you are printing and the filament material that you are using to fabricate the object.
In general, simple objects with less detail can be printed faster without much loss of quality. On the other hand, more complex objects with more detail will benefit from a slower print speed. Because of this, it pays to experiment with your print speed to see what works best for the job you’re printing.
Infill and Shell Thickness
You’re going to be sanding 3D prints after printing in order to obtain the smoothest surface possible. This means that your object is going to need to be a bit more robust in terms of thickness and infill than you previously planned for.
A shell is the outer wall of a designed object. Shell thickness refers to the number of layers that the outer wall will have before infill printing will begin. The higher the setting is for shell thickness, the thicker the outer walls of your object will be.
Obviously, thicker walls make for a sturdier object. So, when you’re planning to finish your object post-printing through sanding, you want to increase the shell thickness to account for the material that you will be removing later.
Fill Density
Fill density or infill is a measure of how much material will be printed inside the outer shell of the object in question. Fill density is usually measured as a percentage of whole, as opposed to a unit of measure. This means that if 100% fill density is selected, the printed object will be solid, with no empty space inside the outer shell. Likewise, if 0% is selected, the printed object will be empty inside.
Fill density is used to conserve filament while printing and speed up printing times. However, an object with more infill will be stronger and heavier than an object with less infill. Again, because sanding removes material from the surface of an object and requires the application of a certain amount of pressure to do so, you’re going to want to increase your fill density when printing the object. Doing so will insure that your object won’t be damaged or deform during the finishing process.
For more information on slicer settings, take a look at our article on the subject here.
Choosing the Right Filament
Slicer settings are not the only thing that affects the amount of potential finishing work that may need to be done once an object is printed. The quality of the printing filament that you are using can impact end quality as well. Poor quality filament contains impurities that will negatively affect how the material melts, extrudes and cools.
In addition, cheaper filament is not produced to the rigid tolerances necessary for high-quality end results. Specifically, variations in the diameter of the filament can lead to under-extrusion and over-extrusion problems during printing, both of which will produce a final object with serious surface flaws that will have to be dealt with through finishing.
Finally, consider using a color of filament that will closely match the desired color of the finished object. Doing so will reduce the amount of painting that needs to be done once printing is over and you’re finishing the object.
Admittedly colour is less important for those truly professional-grade finishes though, because of the amount of primer paint coats needed.
How to Remove Supports From 3D Prints
As you know, a 3D printer starts printing an object from the bottom up. This means that if you have a design that incorporates overhangs, upper areas in your model that don’t have any underlying material, you’re going to run into problems. After all, your printer filament is subject to the law of gravity. It can’t be extruded onto thin air.
In these cases, you will have used a support structure that supplies a surface onto which your overhangs could be printed. These structures, which may or may not be soluble, will need to be removed before the finishing process can begin.
If your support structure isn’t soluble, you will need to break or cut away the supporting material. A pair of flush cutters or an Exacto knife can help you get cuts that are flush with the printed surface of the object that you wish to retain. Once the supporting material has been removed, use a bit of 200 grit or 400 grit sandpaper to gently smooth the support marks.
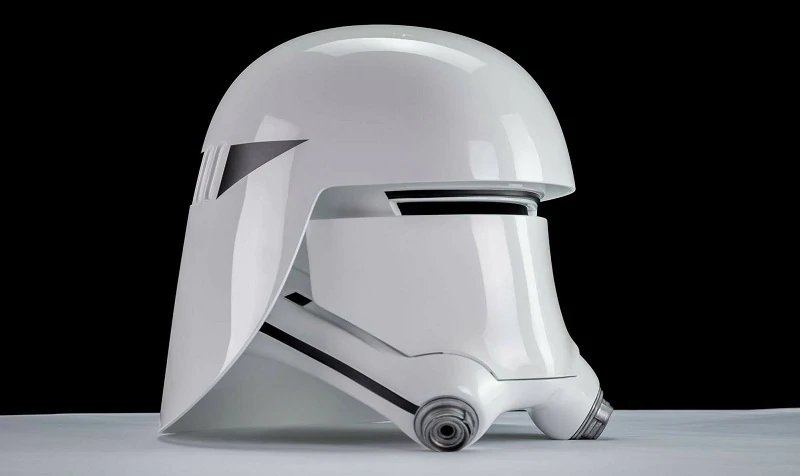
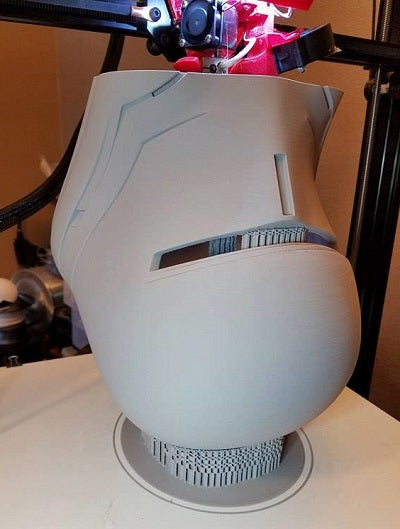
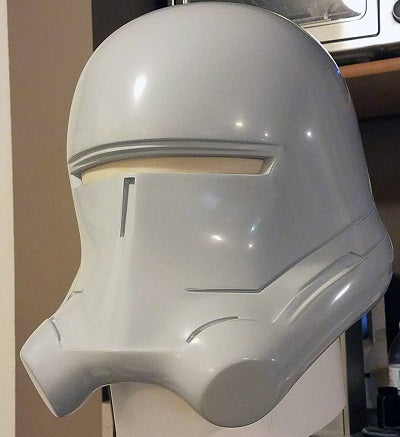
You’ll notice in the image above, the model was printed upside down so that minimal support structures would be left – and so less work to remove them. It’s also easier going smoothing PLA on large, simple areas like the top of the helmet than potentially more intricate parts of underneath.
If your support structure is soluble, you’re likely dealing with either PVA or HIPS. In this case, simply submerge the object in the solvent in question – water for PVA and Limonene for HIPS. The water should completely dissolve the PVA support structure within several hours.
Limonene will take longer to dissolve the HIPS support structure, usually about 24 hours. In both cases, remember to give the containers containing the solvent and your object a gentle shake from time to time to help the process along.
Filling Gaps in 3D Prints
Before you sand and paint 3D printed models, it may be worth filling any small gaps, cracks, or underfilled sections with a 3D print filler solution. This is usually a variant of epoxy resin that is easy to work with, and can be sanded down afterward.
We recommend using XTC-3D which you can get here. You’ll notice you can even use it for smoothing out 3D prints just by brushing it over as a 3D print coating.
Although you won’t get the same level of high-quality finish we’re aiming for in this article – it could be a quick way to improve a print. Think of it as the lazy man’s 3D printing finishing tip.
The neater you are filling the gaps, the less sanding you’ll need to do afterward – so try to be as neat as possible. You’ll also need to leave it to cure for at least a few hours after filling.
How to Sand 3D Prints (& Polishing)

Sanding is a simple and somewhat easy way to finish processing a 3D print, depending on the material in question. Some printing materials respond well to sanding, with other materials it may not be an option.
For example, PLA and ABS can respond very well to sanding. With harder materials, like Polycarbonate and PMMA, sanding is not an option. (We will discuss finishing options for harder materials in more detail below.)
If you’re looking for how to make 3D prints smooth and the material you’re using can’t be vapor smoothed, then sanding it is!
Among the few PLA finishing techniques, sanding gives the best result. Be sure to choose a good quality PLA filament, as poorer filaments can be more challenging to get a good smooth surface on.
Sanding the surface of an object made from PLA or ABS is a fairly straightforward process – as long as you approach the job with some patience. For example, PLA’s lower melting temperature can make it get gummy and soft if it is sanded to aggressively and quickly. Therefore, patience and a bit of time are the keys to getting a smooth mirror finish on any object made with PLA.
Also, you need to be prepared to use multiple grit sizes of sandpaper. For example, with PLA be prepared to use every size from a 200 rough grit to a 3000 fine grit and every gradient in between.
Pro tip: With a material that’s a bit harder, like ABS, you may want to start with the same grit size but try wet sanding the object with a waterproof abrasive sheets such as “Wet & Dry.” A harder material can stand increased pressure while being sanded, but friction still is an issue.
Wet sanding helps reduce the heat that results from friction, allowing for more efficient removal of unwanted material with less deforming of the object due to frictional heat.
No matter the material, you want to start with the coarsest grit of sandpaper. Use a circular motion with a slow moderate pressure to remove unwanted material. The idea is to get rid of what you don’t want while leaving absolutely no trace that you’ve done any finishing work.
Once you’ve gone over the object once with coarse grit sandpaper, you want to repeat the process with a finer grit. For example, if you started with a 200 grit sandpaper, you want to switch to a 400 grit sandpaper on your next pass. Once you’ve patiently done a pass over the object with the 400 grit, you switch to 600 grit and repeat the process.
The idea is to slowly and carefully remove the features on the objects that you don’t want, while slowly and carefully retaining and highlighting the finish on the features that you do want to keep.
When you are scaling up the grit number on the sandpaper, remember that time is your friend when it comes to getting a mirror-smooth finish. In general, the more time that you spend sanding, the better the finish that you will obtain. This is especially true with the lower-numbered grit sandpapers.
Keep working your way up to finer and finer sandpaper grits – 600 to 800, 800 to 1000, and so on. As you get up over 1000 grit, the finish on your object will start to feel really smooth, but don’t stop here. To get a truly professional finish, take the time to carefully go over your object with 2000 girt and then 3000 grit. That extra attention will really pay off in the quality of the finish that you end up with.
Once you’ve sanded your object, it’s ready for either painting or simply polishing, depending on your preference. For more detail on this 3D sanding technique, view our guide on getting a mirror finish from sanding here.
Vapor Polishing
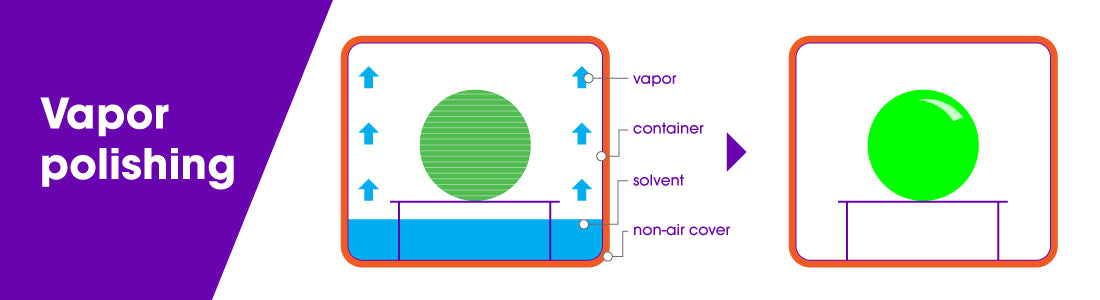
An alternative to sanding is vapor polishing. With vapor polishing, a small amount of an applicable solvent is placed in a container. The printed object is also placed in the container on a platform that suspends it above the solvent. A non-airtight cover is placed on the container and the solvent is then heated until it begins to produce vapor.
This is an analogous process to what happens when water is heated to a point where it begins to form steam. Essentially, the solvent in question is brought to a temperature where it steams, or begins to transition from a liquid to a gas.
Once this happens, the solvent “steam” is allowed to surround, coat, and interact with the surface of the printed object. Ideally, the gaseous solvent begins to slowly and evenly dissolve the surface of the object, removing unwanted material and features.
Once the desired look of the surface of the object is achieved, the object is removed from the container and allowed to air dry. Drying stops the interaction of the solvent with the material the object is made of. The end result is an object with a smooth and professional finish.
As was the case with sanding, increasing shell thickness and fill density prior to printing will produce a more robust object that will be capable of withstanding vapor polishing without problems.
Vapor polishing softens the rough surface layers of the object so that they flow together to produce the desired finish. So if there are insufficient top layers present when using this process, just like with sanding, the undersurface of the object can be exposed and ruin the effect.
While industrial printers and finishers use cloud chambers to vapor polish projects, many makers replicate the process using common objects. For example, a wide-mouthed glass container with a lid or a simple saucepan can be used to hold the solvent. A raft or platform of aluminum foil can be used to suspend the object above the solvent. Finally, the heated bed of your printer or your home range can be used to carefully heat the solvent.
Now a word of caution. Every printing material is soluble is a different substance. Some of these substances are relatively benign, others are extremely toxic.
For example, in ascending order of toxicity, PVA is water-soluble. HIPS is soluble in Limonene. ABS and PMMA are soluble in acetone. PLA is most efficiently soluble in tetrahydrofuran or THF. Polycarbonate is soluble in dichloromethane. The list goes on.
Vaporizing any chemical solvent poses a number of hazards. First, solvent steam is much more readily absorbed by the body through respiration and contact. The more toxic the solvent, the worse the prolonged exposure to the substance will be. Therefore, any vapor polishing must be done in a well-ventilated environment. The use of a respirator, protective clothing and gloves is well neigh mandatory.
Second, many solvents are flammable. Therefore, heating a solvent must be done under controlled conditions. You need to know the solvent’s boiling point and flame point beforehand and use a calibrated thermometer to ensure the temperature of the solvent stays within safe parameters. Always work with a fire extinguisher handy. To read more about vapor polishing, check out our in-depth guide here.
How to Paint 3D Prints (The Right Way)
No matter if you’re prototyping an object for use in a Kickstarter campaign or simply want to create something that’s absolutely stunning in its presentation and perfection, painting may be the way to go.
Successful finishing using paint actually involves two separate processes – priming and then painting. However, before looking at either, let’s take a look at a preliminary step that you need to take that will guarantee stellar results once you start painting.
If you’re wondering: can you paint 3D printed objects – the answers yes of course, but you need to do the right…
Preliminary Steps
When priming and painting an object, it’s best to first mount it on what’s known as a painting block using a dowel. A painting block is nothing more than a block of wood that supports the object while it is being primed and painted.
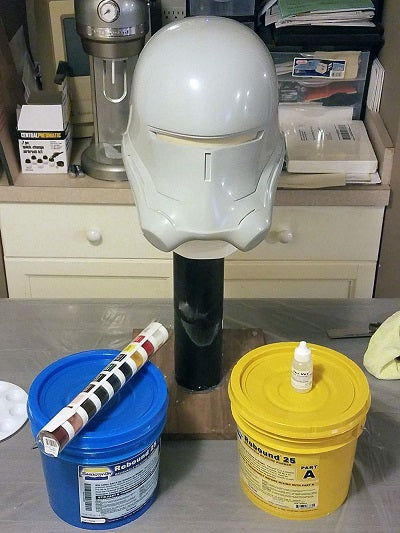
Simply take a wood dowel and, using a drill with a bit that is equivalent to the dowel’s diameter, drill a small hole into an inconspicuous area of your object. Insert the dowel into the hole you’ve drilled until it sets securely. (Alternatively, you can use a naturally occurring hole or declivity in your object to seat the dowel.)
Next, using the same size drill bit, drill a hole into a block of wood large enough to securely balance and support your object. Insert the other end of the wood dowel that you used on your object into the wood block. You now have a way to provide even and smooth coats of primer and paint to your object without having to touch it and risk leaving smears and fingerprints behind.
Also, remember that priming and painting an object can be a messy business. You want to stop the paint from getting on objects that it shouldn’t and you want to keep foreign objects, like dust, from settling on your printed object while it dries. Therefore, work in a well-ventilated area that is clean and well-lit.
Most spray-on paints contain solvents that can aerosolize and be inhaled. Consider wearing an approved respirator and nitrile gloves while priming and painting.
Also consider constructing a simple spray booth by hanging plastic sheeting around three sides of the surface you will be placing the object on while priming and painting.
This will contain the paint to the area around the object and will reduce the amount of dust and debris that will adhere to the object while the paint or primer is drying.
How to Prime 3D Prints Before Painting
Primer for 3D prints is a special type of paint that comes in neutral colors. It is designed to provide a uniform surface that paint can easily bond to. Primer comes in both brush-on and spray-on varieties. When choosing a primer for your object, you are better off going with a spray-on variety.
It will cover the surface of your object with an even coat and will eliminate the use of brushes which can leave noticeable brush marks.
Best paint for 3D prints? For best results, use a primer (and paint) that are compatible with plastic and are of the same brand. Using a high-build filler primer like Krylon and Montana both are good choices.
Before priming your object, spend at least two to three minutes swirling the contents of the can of primer, using a circular motion. Doing so fully dissolves the pigment into the solvent within the can. You should never, under any circumstances, shake the can before you prime or paint. If you do, you will mix the pigment into the solvent, instead of dissolving it.
This will result in the formation of bubbles that will appear on the surface of your object while spraying. After about two or three minutes of swirling, you should hear the metal ball within the can moving smoothly. This indicates that the pigment is dissolved into the solvent and you are ready to begin priming your object.
Start with the nozzle of the can about 15 to 20 cm (6 to 8 in.) from the surface of the object. Using short and rapid strokes, begin spraying the object Start each stroke before the beginning of the object and end each stroke after the end of the object. Move quickly, rotating the object as needs. Avoid over-spraying. The goal is to start with a very thin initial coat that can be built up over time.
Once the initial coat of primer is dry, it’s time to add a second coat. Again, use short rapid strokes that start before the beginning of the object and end after the end. In the vast majority of cases, your object will only need two coats of primer to ensure an even cover that will improve the adherence of the paint you have chosen.
Once your second coat of primer is dry, you want to buff and polish the primer coat. A great and easy way to do this is to use nail buffing sticks, the kind that are available in any chemist or drug store and are used in manicures and pedicures. They come with a three grit surface.
You can skip the roughest surface and use the buffing and polishing surfaces to bring the primer coat up to glossy shine. As you did with the sandpaper, take your time and use a circular motion where possible. The goal is uniformity. When you’ve finished, gently wipe the object with a tack cloth to remove any dust created during the buffing and polishing.
Once you’ve buffed and polished the primer coat, you’re ready to begin painting. The painting process itself involves three distinct steps – undercoating, top coating and clear coating. As was the case with the primer coat, your best bet when painting is to use a spray-on variety. It will give you greater control over uniformity and layer thickness. It will also allow you to avoid brush marks.
Best Primer for 3D Prints
You want to choose a painting that goes on as thinly as possible. One of the best choices is Tamiya. Tamiya paints are specifically designed for use by modelers and radio control enthusiasts. This makes them a perfect choice for finishing painting 3D printed objects.
Undercoating
Applying an undercoat layer will allow you to get the richest and deepest color when painting your object. An undercoat should not be confused with the primer coating. The two serve entirely different purposes. The primer coat is there to give the paint something even to adhere to. It prevents blotching and uneven coverage.
The undercoat layer is there to block the neutral and flat color of the primer. Undercoat layers are usually either solid black or white. Black is used for objects that will be a painted with darker toned colors. Obversely, white is used for objects that will be painted with lighter-toned colors. No matter the color, the undercoat will shine through the topcoat layers, giving the finish a luster and depth that is unmatched.
As was the case with the application of the primer, you want to use a respirator and gloves while painting. Spend two or three minutes swirling the paint can in a circular motion until the pigment dissolves in the solvent. You’ll know that this happened when you feel the metal ball in the can revolve around the inside without resistance.
Once the paint is well mixed, hold the nozzle of the can 15 to 20 cm from the surface of the object and apply the undercoat in short and rapid strokes. Once again, start these strokes before the beginning of the object and end after the end of the object. As always, rotate the object on the painting block while applying the undercoat in the thinnest layer possible.
Once the initial undercoat layer is dry, buff and polish the undercoat layer using a nail buffing stick in the same manner as you did when buffing and polishing the primer. Once this is completed, you are ready to apply a second undercoat in the same manner as the first. Once the second undercoat is dry, buff and polish as you did before.
Top Coating
Now it’s time to apply the top coat. Top coating isn’t about complete coverage. In some sense, it’s the icing on the cake. It’s there to enhance and improve all the work that you’ve already performed. Ideally, the top coat will be a color that contrasts with the color of your undercoat. The top coat will add gradients of color which will allow the contrast of the undercoat to show through. The end result will be a depth and resonance that will make your object look amazing.
All of the steps that you’ve already used when applying the primer coat and the undercoat are also used when applying the top coat. You want to use a respirator and gloves. You want to keep your object mounted on the paint block. You want to keep and the nozzle of the paint can 15 to 20 cm from the surface of the object and use short rapid strokes while painting. You want to rotate your object rapidly on the paint block while applying the top coat. You want to polish and buff in between the first and second coats.
You want to make sure that you don’t apply the paint too thickly when doing the top coating. Remember, the goal is to let some of the contrast of the undercoat to show through the top coat in order to get a sense of depth. To that end, check that there is sufficient contrast showing after the first top coat layer has dried and been polished and buffed. Depending on what you find, apply the second top coat accordingly.
Clear Coating
Clear coating, also known as finish coating, is the last step in the painting process. The purpose of clear coating is twofold. First, the clear coat adds final layers which enhance the finished look of the object. Second, the clear coat protects all of the hard finishing work you’ve already done under a protective coating.
Best Clear Coat for 3D Prints
There are two types of clear coating available – glossy and matte. Obviously, glossy is shinier and matte provides a flatter-looking end appearance. The choice between the two is merely aesthetic. Practically, they both do the same thing.
Clear coat is applied in the same way that you’ve applied every other coating. Respirator, gloves, well-swirled coating, short rapid strokes, etc. You can apply either one or two coats of clear coating depending on the circumstances and the finished look that you’re trying to achieve.
I hope this guide has been a comprehensive breakdown of the available options to you for 3D printing post-processing and gives you a clear layout on how to paint 3D printed models. If you’re willing to put in a little time, truly exceptional finishes can be achieved. But if you’re just looking for tips on smoothing out 3D prints, then this guide will at least have given you some food for thought.
Related:


