How to Use Sanding to Smooth PLA Without Acetone
At 3DSourced we’ve covered everything 3D printing and 3D since 2017. Our team has interviewed the most innovative 3D printing experts, tested and reviewed more than 20 of the most popular 3D printers and 3D scanners to give our honest recommendations, and written more than 500 3D printing guides over the last 5 years.
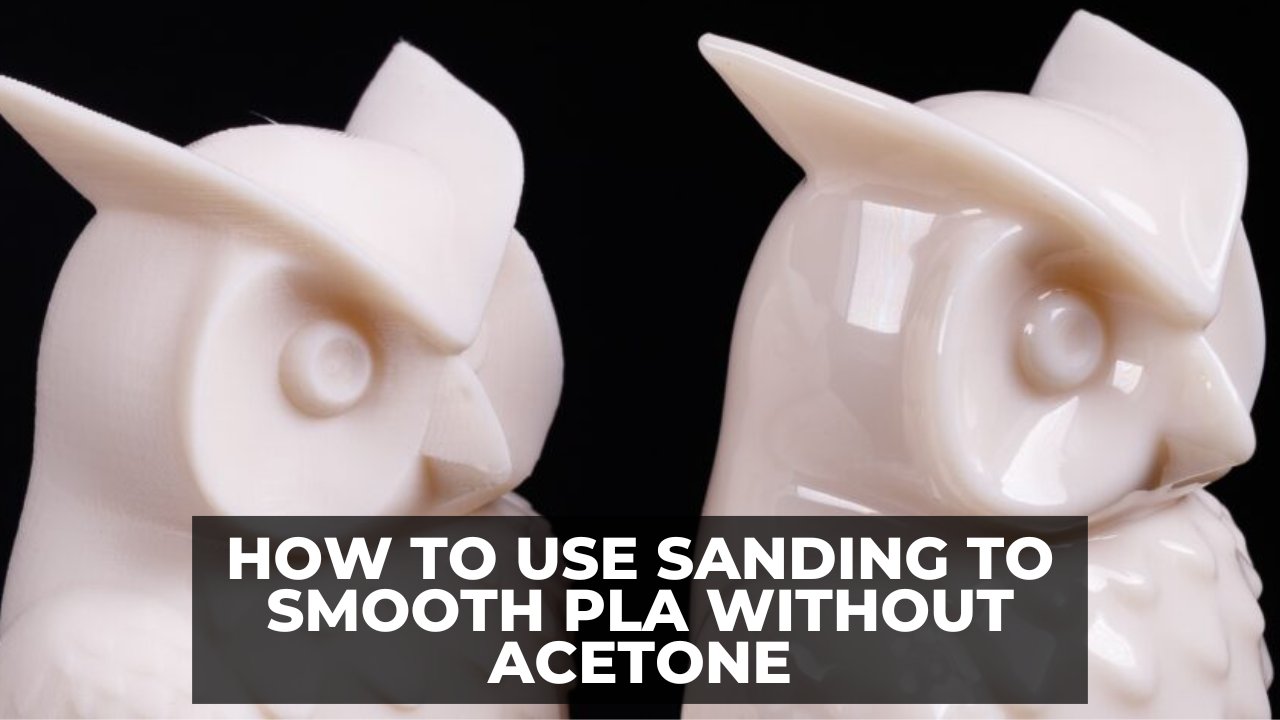
Need to make your prints look super smooth? Or perhaps you just want rid of those layer lines to make your print look more ‘factory finished’?
For any 3D printing materials that can’t be acetone smoothed, this quick guide is for you.
Personally, sanding is my favorite technique when smoothing PLA prints.
And I’m really talking professional grade smoothing. But it has to be done the right way.
With my tested methods, I’ll show you how everything you need to know to polish PLA 3D prints to a shine you won’t believe was ever 3D printed.
The Best Way to Smooth PLA 3D Prints
Can PLA be Acetone Smoothed?
It’s often said that ABS is easy to smooth (using acetone baths and similar methods), but what about PLA acetone smoothing?
Most PLAs and similar non-acetone-dissolving 3D printer filaments cannot be smoothed the same way as ABS. That’s because PLA in its pure form is not reactive to acetone.
When PLA and acetone smoothing works, it’s due to other materials added to the PLA. You’ll usually find that very cheap PLAs that have been blended with cheaper plastics to form a less pure PLA can sometimes be acetone smoothed.
Or on the other end of the scale, modified PLAs with additives can make vapor smoothing PLA possible, or at least acetone bonded.
Generally, the purer the PLA, the less acetone has an effect on it. We should maybe note here: our standard PLA won’t acetone smooth, hence us mastering this new technique!
Read on to learn how to sand 3D prints – with the right technique it’s easy.
- We also have an article on acetone smoothing ABS and ASA
Sometimes, PLA vapor smoothing can be achieved with Ethyl Acetate or even Tetrahydrofuran (THF), but we strongly advise against using either of these chemicals. They’re dangerous, the effect only works with some PLAs and you can lose a lot of detail.
We recommend finishing PLA prints using the technique we’re describing here for your most prized prints, as it can take a little bit of time. Additionally, this technique to smooth 3D prints (with PLA filament) does not work as well on very intricate prints.
Here’s a close-up of the finished effect. The gold filament is Gold/Bronze PLA. This is a 6cm long 3D Benchy for scale, and we only smoothed one side of the hull to compare.

How to Smooth PLA Prints: What You’ll Need for Sanding
We’re coming clean – this how-to smooth PLA guide is mostly achieved from you sanding 3D-printed parts.
When sanding PLA and other lower-temperature materials it’s important not to be tempted to use a powered sander. The heat generated will deform the outer layers of your print.
It’s worth noting, not all PLA is created equal. Poorer quality PLA isn’t as easy to sand as higher quality. So if you are going to sand PLA, you’ll save yourself hassle printing with high-quality filament.
To start, you’re going to need a selection of fine grit sandpapers.
We suggest the following grit sizes when sanding 3D prints (and if you want a really smooth finish like above, we recommend not skipping any steps): 200, 400, 600, 800, 1000, 1200, 1500, 2000, 2500 and finally 3000.
Don’t worry: this sounds like a lot of work – but if your print has a nice finish already each layer will only take a few minutes.
It’s best if you can use ‘wet & dry’ paper when sanding 3D prints (black grit as opposed to beige effect), especially with PLA, because if you’re sanding fast, heat can build up and affect the smooth surface you’re trying to achieve.
Wetting the glass paper will lubricate and cool the surface when you’re sanding PLA prints.
This is not as necessary with smoothing higher temperature 3D printing materials, but still advisable.
The Right Way to Sand PLA for Best Results
Now to the sanding itself.
1. Start with the coarsest sandpaper (approx. 200), sand and smooth the surface until you cannot feel any printing layer lines at all.
You’ve got to sand in a circular motion, as you don’t want any lines from the sandpaper affecting the surface later on.

2. Start scaling up the grit number. Once you’ve got an acceptable result with the 200 or 400, move higher up and smooth the print in increments. Don’t skimp on the time to sand them down in these early stages, it’ll save more work layer (and keep going with the circular motion).
Try to be mindful of details so you don’t lose definition as you go.
The good news is with each finer grit, you don’t need to spend as much time sanding that layer.

3. Keep working up the sizes, from 400 to 600, then to 800 and upwards. Don’t miss out steps when you get to 2000.
It’ll feel really smooth, and will polish nicely at that level – but if you want a 3D print finishing like a mirror you need to build to 3000.

4. The final (and most fun) part is when you actually get to start polishing PLA prints. Layering up those sandpaper increments doesn’t feel like you’ve made much progress, but once you polish up, the final finish looks great.
How to smooth out 3D prints polished to that mirror finish? Well, we’ve found you just need any good liquid metal polish. Our favorite is the ol’ trusty Brasso.

The technique to polish your prints is simple. Get a soft cotton cloth, and apply a small amount of liquid polish. Then apply to your 3D print surface in small circles until all the polish is rubbed into the surface.
Once you’ve finished that, the surface should look reasonably shiny. The final stage is to buff up the surface into that mirrored, polished shine.
Just get an unused area of your cloth, without any polish on, and go back over the area you’ve just worked on to buff it up to a shine. And that’s it.
Here’s a before and after reminder on the technique:

Hope you found this guide on how to smooth 3D prints useful.
Checkout our packed, comprehensive guide for even more professional grade 3D printing finishing techniques here. You’ll also find painting techniques, for making those movie-grade replicas.
Raed more: