
Solved: Stringy 3D Prints, Pillowing & Layer Splitting
At 3DSourced we’ve covered everything 3D printing and 3D since 2017. Our team has interviewed the most innovative 3D printing experts, tested and reviewed more than 20 of the most popular 3D printers and 3D scanners to give our honest recommendations, and written more than 500 3D printing guides over the last 5 years.

One of the most frustrating aspects of 3D printing is printing defects. We’ve all been there. You’ve got a great design. You’ve sliced it and everything looks good. You start the job, excited to see the results.
But your object didn’t print out the way you thought it would. You’ve wasted time and filament, and all you’re left with is a shoddy print.

The good news is that most printing defects are easily solvable once you know where to look and what to do.
In this guide, I’ll walk you through three of the most frequent 3D printer problems and solutions:

We’ll talk about what they are, why they occur, and the techniques I used to prevent them from happening in the first place.
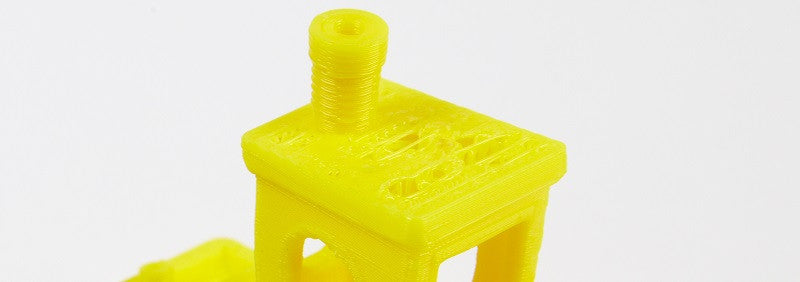
Pillowing 3D Prints

‘Pillowing’ occurs on the top surface of an object. It looks like there are gaps in the surface layer, along with little bumps or pillows.
The above image shows clear gaps have formed, but the ‘pillowing’ pattern isn’t very visible
What Causes 3D Printing Pillowing?
In general, pillowing is caused by a top layer that is too thin and/or improper cooling of that layer. Under certain circumstances, insufficient infill can also contribute to the problem.
Let’s take a look at what you can do to prevent pillowing from happening.
How to Prevent Pillowing in 3D Printing
The easiest way to prevent pillowing is to increase the thickness of the top layer of your object. In most 3D slicer applications, this can be done by going to the advanced settings tab and looking for “Bottom/Top Thickness”.
In most cases, you want to have a top layer that is at least 6 layers thick. This means that if you are printing with a 0.1 mm layer height, you want to set your Bottom/Top Thickness to 0.6 mm.
If this doesn’t solve the problem, you can increase the Bottom/Top Thickness setting to 0.8 mm. In general, the thinner your layer height, the more top layers you’re going to need to sufficiently cover the infill on your object.

On the subject of infill, the less you have the more difficult it becomes to lay down a top layer.
While not a direct cause of pillowing, insufficient infill can contribute to the problem by causing your top layer to droop and sag, especially when you add in additional layers.
Therefore, it is always a good idea to slightly increase your infill percentage when attempting to prevent 3D printer pillowing from occurring.
To learn more about 3D printer infill problems, check out this article.
Cooling & Overheating Issues
When you’re printing the top layers of your object, it’s very important that you are cooling the print material properly.
If the top layer takes too long to cool, it may sag in between the infill layers and curl up where it touches the infill layers. This is especially true when you are using a thin layer height.
The result is an uneven surface that becomes bumpy and uneven as the top layers are added.
Make sure that your cooling fans are operating correctly both prior to printing and as the top layer of your object is being laid down. Make sure that the fans are pointed in the right direction and are circulating air in the direction of the object that you are printing.
Read more: 3D printer too hot / overheating
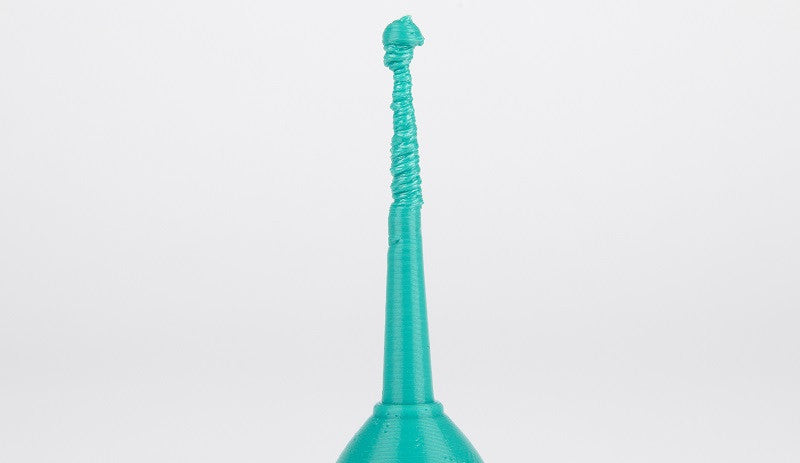
How to Prevent Stringing in 3D Printing
Sometimes your object will have thin strands of material where no printing should be occurring, usually across spaces where the print head has traveled from one printing point to another. This problem is known as 3D printing stringing and it can be one of the most annoying defects to deal with.
Similarly, you can get 3D printer blobs ruining your prints, and these are resolved the same way as stringing. This is one of the most common 3D printing problems.
What Causes Stringing or Oozing?
Stringing is usually caused by the print nozzle oozing print material as it moves from one place to another. The oozed material cools and hardens into thin “strings” – hence the name.
Let’s take a look at a couple of adjustments that you can make to combat stringing.
A print suffering from stringing can be really ugly. In mild cases, you can simply sand off the extra wisps of stray filament. But with the right settings, you can learn to fully prevent this altogether.
PLA stringing and PETG stringing are especially common due to the nature and low viscosity of the material when molten. However, as you’ll read this is easily remedied when using filament of a good, reliable quality.
Here are the 3 causes of your prints stringing or nozzle oozing. Your symptoms may be caused by one or all of these, so it’s worth trying each out (in order) to diagnose the problem. While 3D print stringing is not the direct effect of over extrusion in 3D printing, they are related symptoms.
To combat over extrusion, try the same adjustments as listed below for remedying stringing.
Retraction
Retraction is a slicer setting that is usually activated by default. When retraction is activated, the printing filament is pulled back or retracted into the print head any time the head moves from one print point to another. So, if you’re seeing stringing on your objects, the first thing to do is to check that the retraction setting is indeed active.
If retraction is activated and stringing is still occurring, you can then use the additional settings tab to incrementally increase retraction distance and speed. This will cause the filament to retract farther into the print head more quickly before each new pass.
Temperature
A common cause of persistent PLA stringing, or other materials; is a print temperature that is too high. When the temperature in the print head is too high for the material being used, the filament becomes too viscous and watery and leaks out the print nozzle.
If you’re still experiencing stringing after checking your retraction settings, try reducing your print temperature in 5°C increments to see if that clears up the problem. Incorrect temperature is one of the biggest causes of 3D print problems.
Speed
If you have lowered your print temperature to prevent stringing, you will also likely need to reduce your print speed to prevent potential problems from under extrusion from occurring. A lower print temperature means that the print material will flow more slowly.
Keeping the print speed where it was can mean that gaps and holes can begin to appear in your object in the places where the extruded material couldn’t keep up with the speed of the print head.
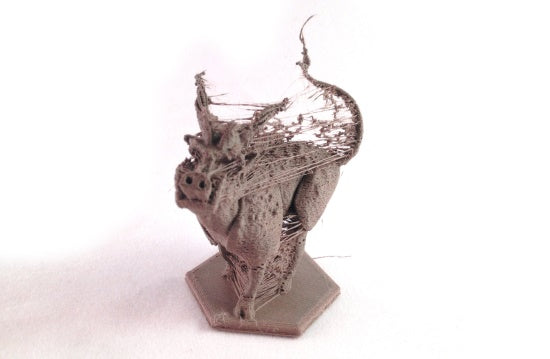
3D Printing Layers Splitting / Cracking

Sometimes a print job will be progressing nicely with no apparent problems. You leave the room, and when you come back you see that your object has developed a split or crack along one of its sides at a point where everything seemed fine before.
Gaps in layers look awful and dramatically weaken your print. They can also be especially common in ABS prints. We’ll advise on how to prevent this below.
What Causes Splitting or Cracking in my print?
As you know, your printer makes an object by laying down layers of print material, one on top of the other. It is imperative that each new layer binds to the previous one.
Splitting occurs when one layer bonds inadequately with another layer, it’s the 3D printing layers separating. When this happens, as the object cools, a split or crack occurs between the two inadequately bonded layers.
Luckily there are a couple of things that you can do to prevent splitting from occurring when using good quality filament.
If you’re still experiencing similar issues with poor layer adhesion in PLA or other materials, it could be down to simply using a cheap or poor-quality grade filament.
How to Solve Splitting or Cracking Layers in 3D Printing
Decrease Layer Height
In order for two layers of print material to bond, the print nozzle needs to apply exactly the right amount of pressure to the layer currently being laid down.
Too much pressure and the layer will move off to one side or smear. Too little pressure and the layer can’t adequately meld to the previous print layer. The result is a crack.
In order to make sure that the print nozzle is applying adequate pressure, make sure that your layer height is about 20% smaller than your print nozzle diameter. That ratio ensures that the nozzle is pressing down enough on the material being extruded to adequately bond it to the previous layer.
Increase Print Temperature
If your material is being extruded at too cool of a temperature, it cannot easily bond with the material that’s already been laid down. Therefore, as it cools, it will shrink and pull away from the layer below it. The result is a split or crack.
To avoid this from happening, increase your print temperature slightly. The slightly higher temperature will ensure that the extruded layer bonds with the previous layer so that both layers essentially cool as one object, thus avoiding the splitting that would otherwise occur. You may also want to play around with reduced cooling, to get a really good layer adhesion.
Just be careful you don’t go too far and end up with any of the cooling-related issues mentioned earlier in this article.
If you’re still experiencing splitting layers after this, you may need to print in an enclosed area to keep the ambient temperature higher. This will slow the cooling process and put less strain on the print as it contracts slower.
A simple enclosure can be made using a large box over your printer – although we recommend using the enclosure kits that most printers now offer as an upgrade.
Related articles:


