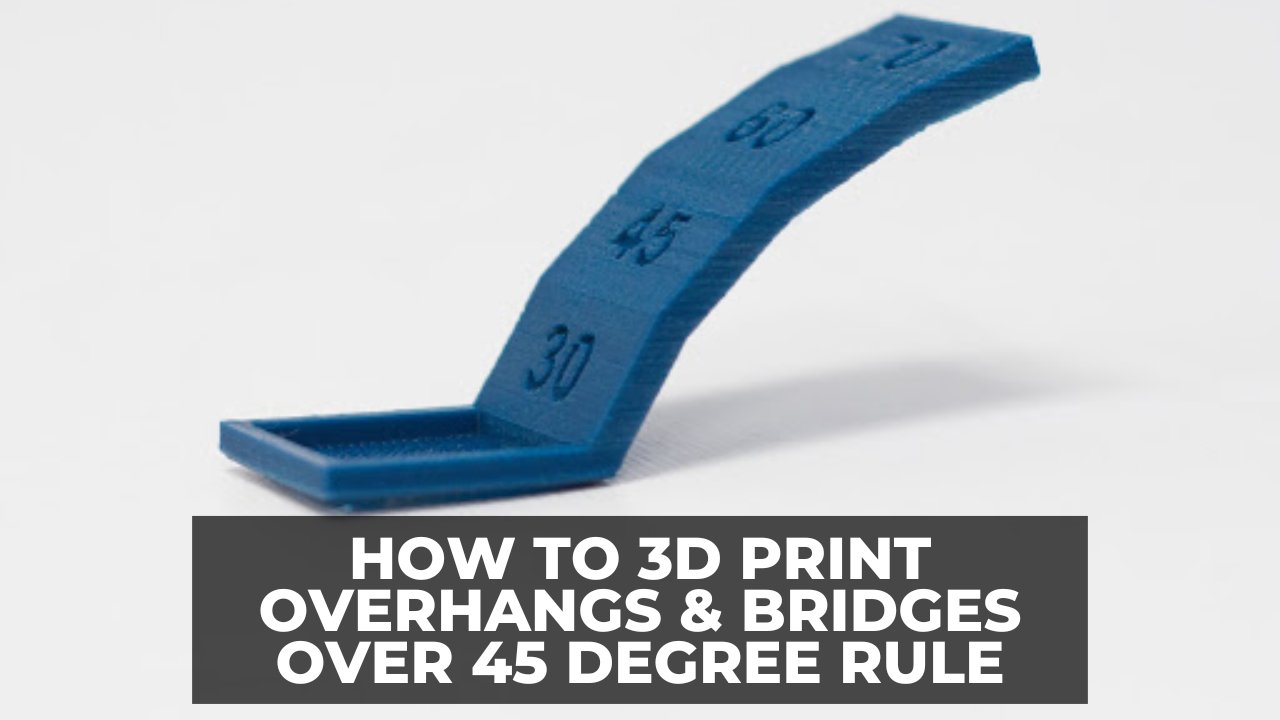
How to 3D Print Overhangs & Bridges Over 45 Degree Rule
At 3DSourced we’ve covered everything 3D printing and 3D since 2017. Our team has interviewed the most innovative 3D printing experts, tested and reviewed more than 20 of the most popular 3D printers and 3D scanners to give our honest recommendations, and written more than 500 3D printing guides over the last 5 years.
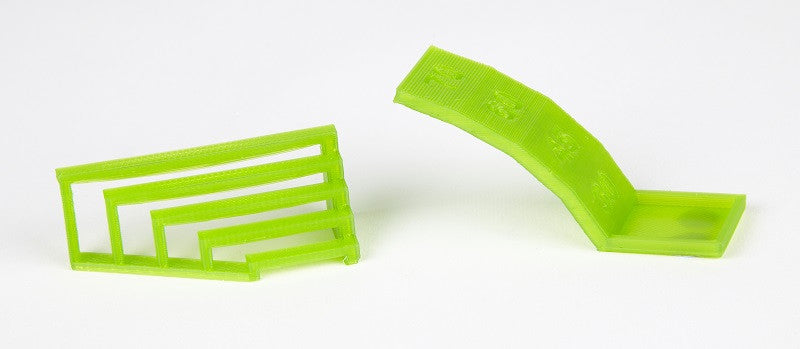
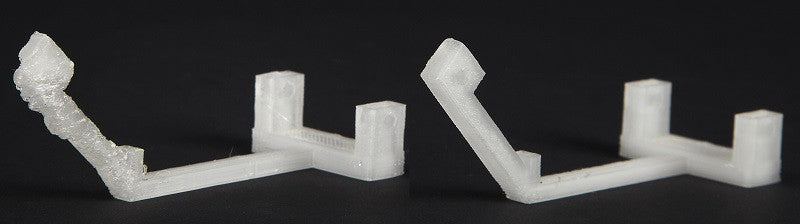
The difference? Bridges on the left, and the right is an increasingly proportionate overhang
As you progress with 3D printing, you’ll want to produce objects that are more complex.
You will need the secrets to break 3D design limits like the “45 degree rule” to see what’s really possible.
In this guide, I’ll explain how to print overhangs and bridges without resorting to needing hard-to-remove support structures.

We’ll cover the best techniques I’ve learned for producing prints that appear to defy gravity, helping you avoid the print-ruining mistakes that most overhang beginners tend to make
Read on to learn our best 3D printing overhang tips and experience-based advice on solid bridging. You’ll be printing the 8th wonder of the (3D printing) world in no time.
Table Of Contents
- Why Would You 3D Print An Overhang?
- What is an Overhang in 3D Printing?
- The 45 Degree Rule
- How to 3D print a Support Structure for Your Overhang
- How To Exceed 45° Without the Use of Support Materials
- Make Sure Your 3D Printer is Prepared
- Solidify Your Print Material Quickly
- Adjust Your Slicer Settings
- Reduce Your Speed
- 3D Printing Bridges
Why Would You 3D Print An Overhang?
Let’s start with an overview of the basics to this type of 3D printing ‘problems and solutions’ guide. As you know, a 3D printer starts printing an object from the bottom up. Theoretically, every layer of extruded material is either supported by the print surface or the previous layer of material.
However, with objects that have more complex designs, there can be upper areas that are not supported by underlying material. These areas are known as overhangs or bridges, depending on the shape of the design.
Think of the letters Y, H, and T. The letter arms of the letter Y consist of two overhangs at a 45° angle. The crossbar of the letter T consists of two overhangs at a 90° angle. The letter H, on the other hand, contains no overhangs at all, but does include a bridge that is supported at either end by two uprights.
The different overhangs and the bridge in these objects all present the same basic problem. Your printer filament is subject to the law of gravity. It can’t be extruded onto thin air. So, what’s the solution?
Well, even though all three objects present the same basic problem, the solution to that problem depends on the shape of the object itself. So let’s take a look at what type of solutions exist for the problems presented when printing overhangs and bridges.
What is an Overhang in 3D Printing?
Rather than thinking about how to add support for 3D printing, let us open your mind to the possibility of extreme overhangs.
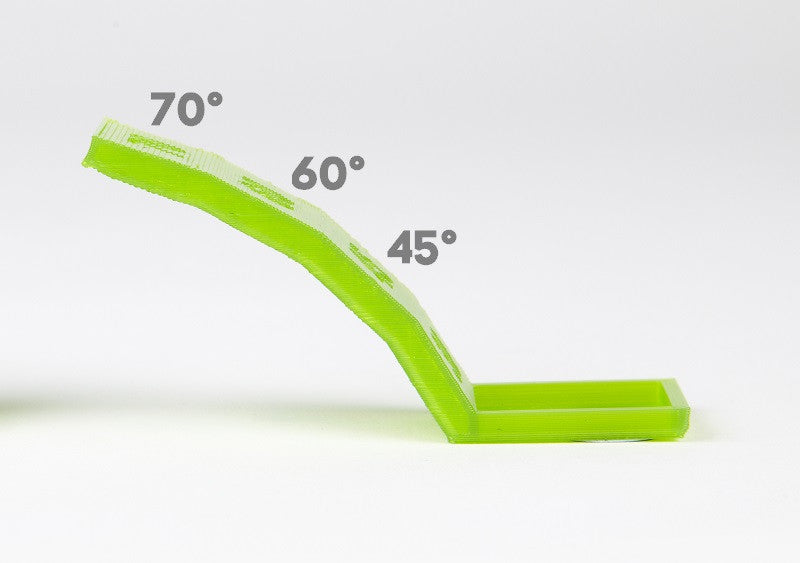
Basically, in order to create an overhang at any angle less than vertical, your printer offsets each successive layer. The lower the angle gets to horizontal, or 90°, the more each successive layer is offset.
So, for example, with a 45° angle, each successive layer is offset by 50%. In other words, 50% of the new layer remains in contact with the layer below.
This type of contact provides fairly substantial stability, as each new layer has enough foundational material to grab onto and stay put.
However, when we begin to get closer to horizontal, the amount of offset becomes more and more extreme. For example, with a 75° angle, each successive layer is offset by nearly 80%.
In other words, less than 20% of each new layer remains in contact with the layer below.
It’s readily apparent that this type of contact is much less stable than the contact which occurred at 45°. Every new layer has much less surface area to bond with.
Very often, the result is delamination of layers or sagging of the overhang and even collapse. So what’s to be done to prevent this from happening? Let’s take a look at a couple of solutions.
The 45 Degree Rule

You could avoid the entire problem by following the 45° rule.
The 45 degree rule in 3D printing is a general rule used in 3D modeling that advises against designing objects that contain angles greater than 45°.
But who cares about general rules. You know a better way.
By eliminating angles greater than 45° in your designs, you also limit the scope of what you are able to create. So, in some sense, the 45° rule isn’t always a viable solution to the problems presented by overhangs.
Note: In order to print more complex objects, you will likely need to have to deal with overhangs, bridges and angles in excess of 45°.
Some beautiful and functional objects require difficult overhangs to obtain their beauty or functionality. So let’s keep looking.
Use a Chamfer
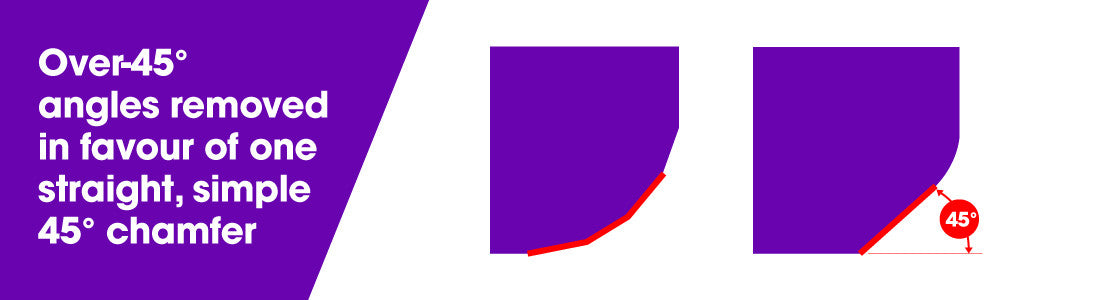
A chamfer is one of those ‘cheat’ 3D printing techniques – a symmetrical, sloping surface at an edge or corner that is used to avoid violating the 45° rule.
In other words, a chamfer essentially makes an angle that is greater than 45° and turns it into an angle that is 45° or less. Here again, we have a solution that solves the problem of difficult overhangs by delimiting design.
In some cases, the use of a chamfer might work fine. In other cases, a chamfer could destroy the integrity of the object that you were trying to produce. So, a chamfer isn’t so much a solution to printing difficult overhangs as it is a way to avoid them.
How to 3D print a Support Structure for Your Overhang
So if you must cheat, here’s how it’s done…
A support material, as the name implies, is a printing material used to support overhangs on a designed object. Your printer first lays down a layer of support material underneath the area where the overhang will be.
Once the supporting printing filament is in place, your printer is able to continue laying down the upper levels of your model. Once printing is completed, the support material is removed.
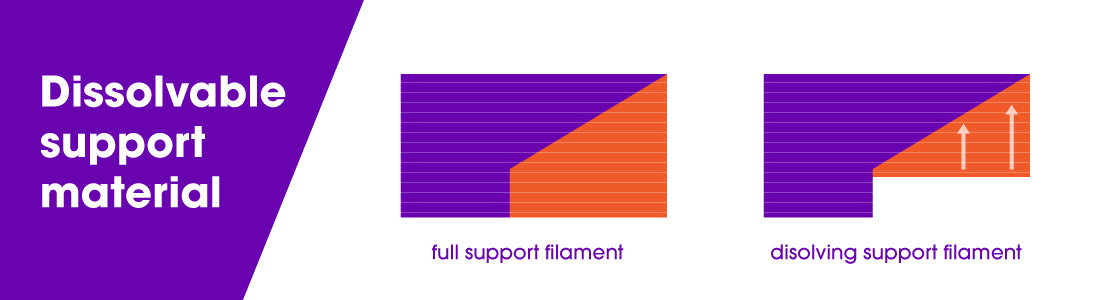
Most support materials are soluble because they need to be removed after printing. For example, PVA is soluble in water, while HIPS is soluble in Limonene. After printing is finished, the object is submerged in a container containing the solvent in question.
After a certain amount of time and some gentle and occasional agitation, the support material dissolves, leaving the object and its difficult overhangs intact.
Not all support materials are soluble. Some printing materials are compatible for use with a breakaway support material. A breakaway support material is printed underneath the area where the overhang will be, just like a soluble material.
However, unlike a soluble material, once printing has finished and the object has cooled, the breakaway material simply and cleanly snaps off the object, leaving the difficult overhang intact.
Hide Your Support Material
Another solution is to design your object so that difficult overhangs are supported but, because of the design, the eye is fooled into thinking that no support was used.
This is a trick that sculptors have been using for the last two thousand years. For example, take a look at “Venus Victrix” by the Italian sculptor Antonio Canova.

The right arm is an overhang, but the pillows act as a support. Likewise, the left leg is another overhang, but this time the bunched toga underneath does the necessary supporting.
The point is, with careful design, support for overhangs can be incorporated into an object in such a way that it doesn’t look like support. Instead, the object retains an organic look that naturally incorporates what otherwise would be difficult overhangs.
How To Exceed 45° Without the Use of Support Materials
45° is often the steepest angle that can be achieved without utilizing support materials. However, under the right circumstances, steeper angles are possible.
Let’s take a look at how.
Make Sure Your 3D Printer is Prepared
In order to print overhangs that contain angles steeper than 45°, you have to make sure that your printer is in tip-top shape. Make sure that your bed is level. Replace your build surface if needed.
Check that the print nozzle is clean and clear of any debris or carbonized build-up. We recommend using Floss cleaning filament for an effortless, fast and thorough nozzle clean.
In general, perform all necessary routine maintenance so that you have the most precise build space possible. You’re going to be doing some very precise printing, you want to make sure that your machine is up for the challenge.
Solidify Your Print Material Quickly
As we saw above, angles above 45° mean less contact between each successive layer in your overhang. This increasingly minimal contact means that the longer the material takes to cool, the greater the chances are that sagging, delamination or collapse will occur.
Because time is of the essence, make sure that you are doing everything that you can to solidify your print material quickly. Make sure that you are making good use of your layer cooling fan.
Your material needs to shed quite a lot of heat in a short period of time. Consider using a radial fan setup with a ducted blower which displaces more air than an axial fan.
Also, try printing at a slightly lower temperature than normal. You want to find the sweet spot that is slightly above the material’s melting point but still hot enough to prevent clogging of the print nozzle.
This will not only help with cooling, but it will also prevent potential over extrusion of the print material which, as we will see in a moment, can be catastrophic when printing extreme angles.
Make sure you’re using high-quality filament, good quality PLA can be printed at lower temperatures while maintaining excellent layer adhesion. This means you can span those distances neatly, without compromising strength or the finish of your print.
This is also the trick to minimizing stringing, which can plague overhangs and bridges. Better quality filament maintains its viscosity consistently and won’t leave stringing.
Using lower temps, better cooling and increasing retraction settings will also prevent stringy 3D prints which could make your bridges look messy.
Adjust Your Slicer Settings
First, adjust your slicer settings to use the lowest layer thickness possible. This is effective when printing a difficult 3D printer overhang because there is less material being deposited with each pass of your print head.
Less mass equals quicker cooling time.
Second, change your shell settings/perimeters so that you printing from the inside out instead of the outside in. This will help anchor your topmost layer to the layer underneath as you print.
Reduce Your Speed
Again, rapid cooling is essential for successfully printing angles above 45°. Reducing your print speed can help you speed up this essential cooling. The slower the speed of your print head, the longer that it takes for your material to get from the print nozzle to the object.
In addition, slower print speeds mean that your layer cooling fan spends more time directing air flow over a particular section of your object.
Once you’ve got your printer up to speed and you’ve dialed in your settings, it’s a good idea to print a calibration object. A calibration object will allow you to test your settings before you pull the trigger on printing an object that you’re going to use.
When it comes to overhangs, there are a lot of designs out there, like this one on Thingverse, that will push your printer and your printing skills to the limit.
3D Printing Bridges
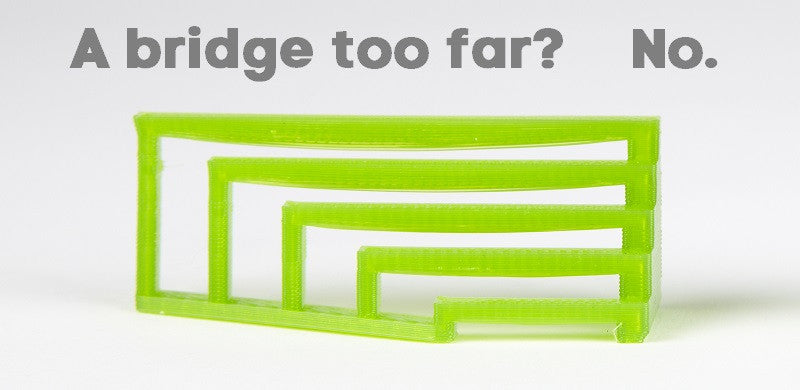
Bridges present much of the same printing problems as overhang 3D printing. The difference is that bridges, by definition, are 90° surfaces supported by nothing more than two vertical structures at either end.
Like any bridge, it is the tension on both ends of the string of print material that prevents the middle of the string from collapsing. In some sense, because of the angle involved, you could describe bridging 3D printing as the most difficult overhang of all.
In general, the shorter the length of the bridge, the greater the chance that the bridge will succeed structurally. Conversely, the longer the bridge, the greater the chance that it will succumb to structural stress.
As a result, just as you are generally in safe territory with overhangs containing angles less than 45°, you are also generally ok with bridge lengths of 5mm or less.
However, as was the case with overhangs, in order to create truly beautiful and functional objects, you’ve got to be able to stretch the limits of what you, your printer and the filament you’re using can do.
After all, at least with bridges you don’t need to worry about 3D printing support material removal. Let’s take a look at some of the techniques that will help you bridge the gap in your designs like never before.
Luckily, bridges are just a variant of overhangs. This means that, by and large, the same techniques that help you print angles over 45° will also help you lengthen the distance that you can cross with your bridges.
Learn How to Print Overhangs Without Support
Our 3D printing bridging tips are, firstly, to make sure that your printer is operating at optimal levels. You also want to make sure that you are cooling your printing material as rapidly as possible.
Just as with overhangs, the longer it takes for your material to cool, the more likely it is that your bridge will deform or fail. Therefore, use your layer cooling fans aggressively.
Also, lower your printing temperatures as much as possible. Adjust your slicer settings and reduce your printing speed to facilitate the cooling that will let your bridge the largest possible distance.
It helps to use a good quality, low-temperature grade material to begin with.
Print slower! Get from one end to the other in nice and smooth way; there’s no need to rush. The extra time will allow for better adhesion of the layers, resulting in a stronger, neater bridge.
In addition, there are one or two other tricks that you can try to make printing bridges easier. First, if you’re faced with an extreme bridge distance, try changing the orientation of the object that you’re printing.
A difficult bridge may be impossible when the object is viewed vertically. However, the impossible bridge is a piece of cake if the object is rotated 90° and printed on its back.
In some respects, printing a bridge is more likely to succeed than printing an overhang, because you have two anchor points for a bridge – one at each end.
However, it’s worth bearing in mind that this only works well as long as the bridge is perfectly level, spanning only one layer. If it’s tilting upwards just slightly, spanning a few layers, the bridge will not complete quickly (or neatly) in a single layer.
You can also make difficult bridging situations easier by slightly altering the shape of the bridge. A flat bottomed bridge enforces the 90° angle that is so difficult to print.
By altering that angle slightly, say with a slight arch, you reduce the difficulty of the print angle. A straight 90° angle suddenly becomes a much more forgiving 60° to 70° angle due to the added arch. Much more achievable in the long run.
Finally, choose a printing material that is of high quality to get those overhangs with the minimum of fuss. The quality of any print is surprisingly dependent on the quality of your filament, and bridging is no different.
Related articles:


