3D Prints Warping or Curling Up? (How to Prevent It)
At 3DSourced we’ve covered everything 3D printing and 3D since 2017. Our team has interviewed the most innovative 3D printing experts, tested and reviewed more than 20 of the most popular 3D printers and 3D scanners to give our honest recommendations, and written more than 500 3D printing guides over the last 5 years.
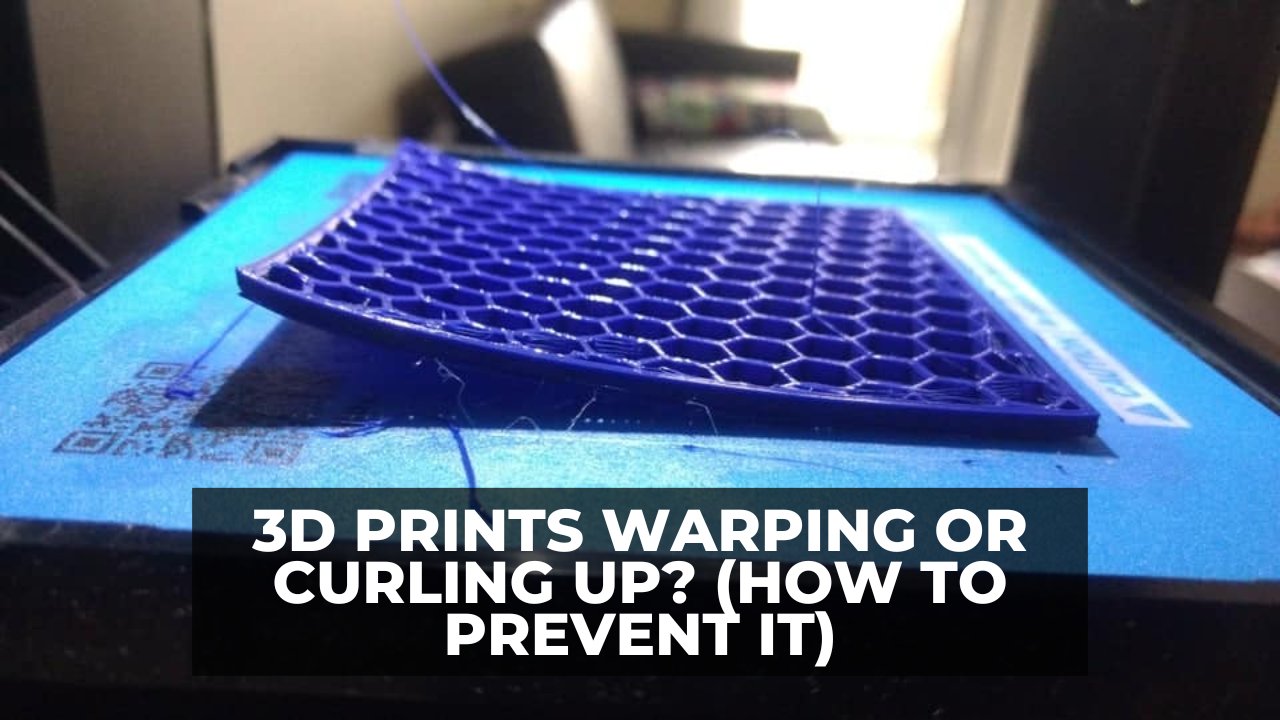
If you’ve used a 3D printer, then it’s likely that you’ve experienced 3D print warping or curling.
Warping is one of the most common problems encountered in 3D printing. It can deform your prints to the point that they look unacceptable and unprofessional, or cause your print to pop off the heated bed and fail completely.
But luckily, it is usually easy to prevent.
The main reason for warping is uneven cooling after printing, causing contraction and stress along the object’s lateral surfaces, especially at corners.

But there are also a number of other, sneakier causes that I’ll point out along with the corresponding fixes.
By the end of this guide, you’ll be back to producing crisp prints without any warping or curling – so let’s walk through it.
Why Has My 3D Print Warped?
A 3D printer warping problem typically occurs when an object is cooling unevenly after printing.
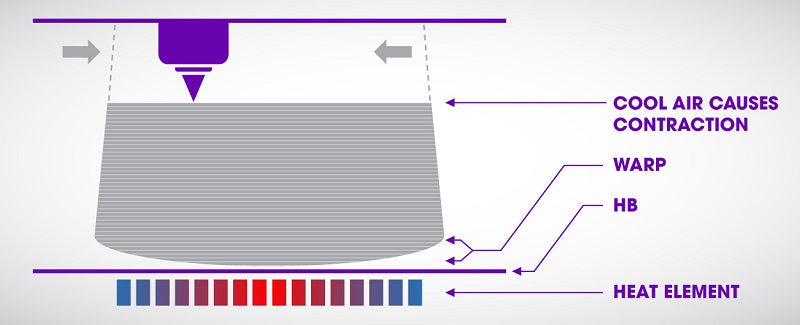
Cooling, as you know, causes contraction and this contraction causes stress along the object’s lateral surfaces. The quicker the cooling occurs, the greater the stress on the object.
This stress is greatest at corners where two sides meet. There, the pulling stress exerted on both sides causes the corner of the object to deform and pull up and inward. The result is not pleasing to the eye and usually makes the object unusable.
There are really only three ways to prevent 3D printer curling; increasing ambient temperature to reduce cooling time, or seriously improving your bed adhesion. Luckily there are simple ways to do all three, which we’ll cover shortly.
But first, what if it’s too late – and you have a warped print right now? Well, maybe not all is lost just yet…
How To Fix a Warped Print
While not all warped prints can be fixed, if the print bottom warping is slight – and your print isn’t too thick or large in volume you might just be able to salvage it.
To do this, you’ll need to heat up the print close to its glass transition temperature (where it’ll get just soft enough to mold back down).
You’ll need a large metal surface, like a frying pan, big enough to place the print bed side down (just the way up it came off your print bed).
Get a hairdryer and place the print in the pan. Heat it up on full power, and move the dryer around to evenly heat it.
After a minute or so, you can turn off the dryer and you should be able to hold the print down to bend it back to a flat shape. You’ll need to hold it for a few minutes until it’s cooled a bit.
Repeat this process until it works sufficiently. Don’t bother just putting the print back on a heated bed, or worse heating the pan – because this will just heat the bottom of the print. You’ll need to heat it up evenly all over.
The Best Ways to Prevent 3D Print Warping and Curling
Heated Bed
Once upon a time, heated print beds were relatively rare. Because of this, printed objects tended to cool very quickly once a job was underway.
This caused high levels of lateral stress and ABS curling was commonplace.
Today, most people are printing on a heated print bed. This causes a printed object to cool much more slowly. This reduces the stress caused by contraction which, in turn, helps to reduce warping.
Heated beds are not an all-in-one solution to warping, but when used in conjunction with other preventatives, they do lower the chances that your object will warp.
One thing to note with heated beds, is that the heating element isn’t always the full size of the bed – this means the edges might not get hot enough (depending on your printer). The diagram below illustrates the common causes of warping.
So it’s worth taking this into consideration if large prints warp, but smaller central ones don’t.
This is also assuming the heat on your bed is even. Still getting ABS warping on a heated bed? It could be because the heating elements are not even under the glass or metal plate.
Check out this thermal image of a very popular model of 3D printer. Can you guess what it might be?
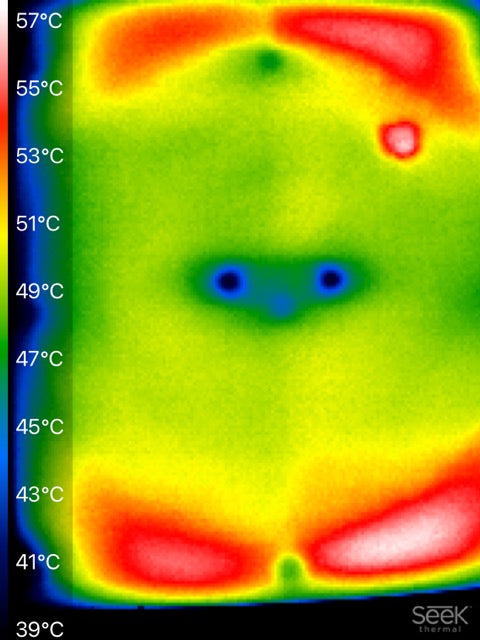
The target temp for this bed is 50°C, notice the cooler area in the center. Commonly this is where people normally place smaller prints. So you may be getting small prints warping, but larger prints staying flat and printing fine.
It should also explain why you may be getting your PLA curling in some areas of the print but not others, for example.
It’s also worth noting that if your bed is made of particularly thick aluminum or glass – the thermometer may be reading full temp before the actual surface of the bed has had the chance to fully heat up yet.
In this instance, you’re best off waiting a good 10 minutes after your bed is reading the correct temperature before you start to print. This could mean the difference between first layer success and your ABS lifting later in the print.
Consider Your Filament Material
It’s extremely important to regard how different printing materials are affected. For example, PLA doesn’t require a heated bed. However, when printed on one at around 50°C it can help those first few layers adhere a little more consistently.
But if you’re getting 3D print warping PLA then it’s likely at too high a heated bed temperature (eg. over 60°C) can cause it to warp.
Rule of thumb for PLA warping on a heated bed – you’re likely printing too hot.
Whereas if you’re getting 3D printer ABS warping with the heated bed, a big culprit is likely to be that the heated bed simply isn’t getting hot enough. So usually just turn it up!
Another way to prevent ABS from misbehaving, as it can be a common issue, is to improve the ambient temperature of the printing enclosure to slow down the cooling of the print.
Generally, it’s always best to print ABS in an enclosure, or failing that a warm ambient environment.
With something very sensitive to cooling too fast, like the UV resistant ASA; you’ll definitely want to make sure it’s printed in a warm ambient area with no drafts or it can warp so badly you see cracks in the print. More on this later.
These rough assumptions are based on you using the correct adhesive or surface for your material. This is also really important to prevent 3D printing warping – but don’t worry, more on this below.
Use a Build Surface that Promotes Adhesion
This is quite likely the most important step that you can take to eliminate warping in your printed objects. Most printers come with a glass or aluminum build surface that is durable, but also far too smooth.
A key aspect when working out how to prevent ABS warping is getting your adhesion for the bed sorted perfectly.
Extruded thermoplastics have nothing to grab onto when they encounter smooth surfaces. The result is that warping caused by cooling becomes more pronounced.
The solution is to start using build surfaces that enhance adhesion. There are a number of things that you can try in order to achieve this. Painter’s tape and Kapton tape both work well to reduce warping in PLA and ABS respectively.
Hairspray applied directly to the build surface to increase tackiness is used by many in a pinch, but it is messy and has limited durability.
If you’re having persistent issues with your ABS print warping, you may want to use a mixture of ABS slurry or ABS juice on your bed, which should significantly aid adhesion.
What is ABS Juice?
ABS juice is a mixture or partially dissolved ABS scraps in acetone, to make a solution that can be painted evenly onto your heated bed.
Pritt stick accomplishes the same effect much more efficiently and with much less mess.
Finally, a substance like PEI (polyetherimide) comes in sheets that are easily attached to your build surface, are affordable and give excellent adhesion to just about any print material (except Nylon). Find out more about build surface adhesion solutions here.
PEI for the most part is one of the best bed surfaces to avoid warping, unless you’re using Nylon based materials that tend to respond best with Tufnol.
Clean Your Build Surface
No matter how adhesive your build surface is, dirt and grease will conspire to reduce that adhesion and put you back at square one when it comes to warping.
Make sure that your build surface is as clean as possible before you begin printing.
An ammonia-based product like Windex or Halford’s Glass Cleaner works great to remove grease and fingerprints from the build surface. Isopropyl alcohol and water solution also work well.
When your build surface is clean, your print material has a much greater chance of adhering which will reduce warping.

Rounded Corners
Your PLA curling at the corners? One interesting way to reduce warping is to design objects that have rounded corners whenever possible.
A rounded corner tends to ameliorate the amount of upward stress that occurs where two or more flat surfaces meet, by distributing that stress over a wider area.
Less stress means less warping and less 3D print curling, which means more successful printing.
Check Your Starting Z Coordinates
Sometimes, printing a good first layer is key to achieving a successful result. One way to increase the odds of putting down a decent first layer is by checking your starting Z coordinates before printing.
If the Z-axis is starting too high, extruded print material has a longer distance to travel before contacting the build surface.
The longer the distance that the material has to travel, the cooler the material becomes and the greater the chances are that it will not adhere correctly.
If you’ve tried everything and are still experiencing warping, try lowering the Z-axis height in 0.05mm increments and see if that corrects the problem.
As you do this, keep in mind that you never want your extruder nozzle to come too close to the build surface, as this will cause its own set of problems.
If your print has a low surface area, and is proving hard to stick down it may also be worth printing a brim or skirt around your print to encourage extra adhesion to the bed.
Here’s an example:
Eliminate Drafts
The key to controlling warping is a slow and steady cooling process.
The quicker that cooling occurs, the more likely it is that your object will warp, no matter how many steps you’ve taken to prevent it.
This is why eliminating all drafts while you’re printing is extremely important if you want to reduce the instances of warping.

You should consider printing in a room in your house or place of business that provides the steadiest ambient temperature. Remind others in the area that you have a print job running and ask them to stay out of the room in question for the duration.
Having someone open a door while your printer is running can cause the warping that you’re trying to prevent.
If your home or office is especially drafty, or if your printer must be located in a somewhat high-traffic area, you might want to consider enclosing it so that temperature remains stable, or just significantly hotter while you print.
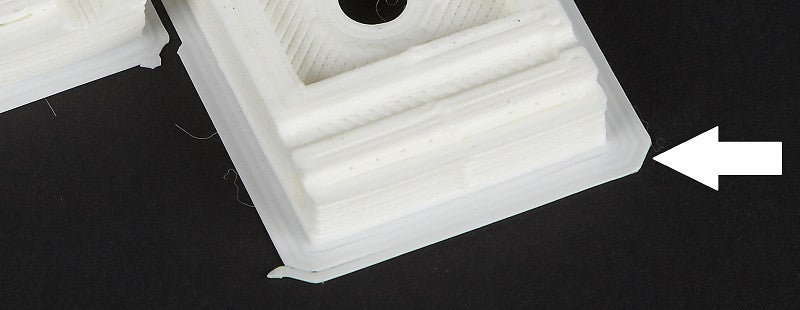
What is Elephant’s Foot?
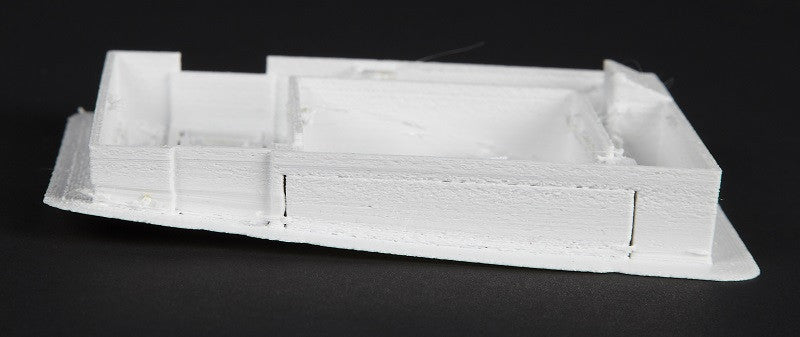
Related to warping, but a slightly different fault is something we call 3D Print Elephant Foot – it’s when the base of your print widens out, shaping the object like, well – an Elephant’s large foot.
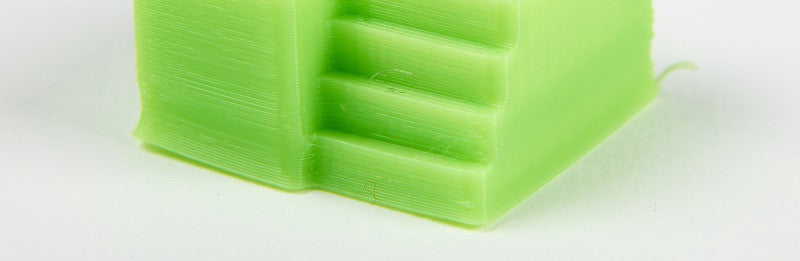
You can see the bottom few layers here have spread out wider than the rest of the print. Here’s how this phenomenon happens and how to solve it:
Essentially your first few layers are being squashed, causing them to ooze out to the side. This is usually caused by a combination of factors:
- Your bed is likely to be much too hot. If the object also warps off the bed, this is almost certainly the main cause. Having a bed that is too hot also allows heavier prints to compress the lower layers, causing them to sag and flow outwards.
- Having your nozzle too close to an overly-hot bed can cause a lesser version of this. In some cases, it may exacerbate the other two factors quite considerably if not corrected.
(Some beds such as FR4 or PEI require a higher temperature to ensure initial bed adhesion with PLA so) there’s nothing wrong with putting down the first layer onto a bed at say 55-60°C, as long as you reduce it to 45°C for all subsequent layers.
Don’t forget, the bed will take time to cool.
How to Solve 3D Printing Elephant Foot
Assuming the elephant’s foot is happening evenly on all base sides of your print, increase the Z-axis offset slightly, to allow more room for those first layers to settle at the correct height. We recommend starting in 0.1mm increments.
Too much and you’ll risk there not being enough pressure for the print to have sufficient adhesion to the bed.
If the elephant’s foot is only on one or two sides, you’ll need to re-level your bed.
Finally, if you’re finding that it’s a heavy, large model weighing down those first layers (you’ll notice this effect increases the larger the print gets if this is the case) then you’ll need to reduce temperature of the heated bed.
Too hot and you’ll soften the material too much.
Follow These Steps to Prevent Elephants Foot
- Level your heated bed
- Adjust z-axis offset/or the nozzle height from the bed
- Correct heated bed temperature
As we said, warping is one of the most common problems that occurs when 3D printing. The good news is that even though it can be caused for a number of reasons, it is relatively simple to prevent.
Related articles:


