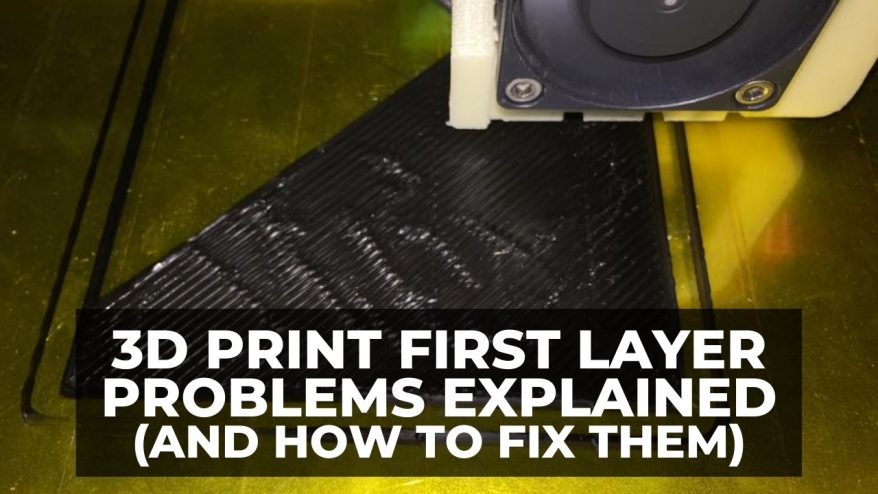
3D Print First Layer Problems Explained (And How To Fix Them)
At 3DSourced we’ve covered everything 3D printing and 3D since 2017. Our team has interviewed the most innovative 3D printing experts, tested and reviewed more than 20 of the most popular 3D printers and 3D scanners to give our honest recommendations, and written more than 500 3D printing guides over the last 5 years.
Your 3D print’s first layer is probably the most important layer — and most common 3D printing problems stem from a poor first layer, so it’s essential to provide proper adhesion to the build plate.
There are a variety of factors that can affect your 3D printer’s first layer failure, and in this article we’ve listed every potential issue, with exactly how to fix each one.
Table Of Contents
- What are the Most Common Causes of First Layer Problems?
- What Causes a Rough First Layer?
- 1. Nozzle too close to the bed
- 2. Nozzle too far away from the print bed
- Signs that your nozzle might be too far away from the bed:
- Explanation:
- How to fix this first layer issue:
- 3. Print Not Sticking To Bed
- 4. Use The Right Bed Adhesion
- 5. Slow down first layer speed
- 6. Use Brims and Rafts
- 7. Check You Have the Right Temperature Settings
- First Layer 3D Printing Tips for Specific 3D Printers
- How Do You Improve the First Layer of a 3D Print?
- What Should a First Layer Look Like in 3D Printing?
- What Causes Ripples in the First Layer of a 3D Print?
- What Is the First Layer of a 3D Print?
- How Thick Should the First 3D Print Layer Be?
- How to Slow Down the First Layer in a 3D Print?
- How Do You Make the First Layer of a 3D Printer Stick?
What are the Most Common Causes of First Layer Problems?
Here’s a breakdown of the most common culprits behind the problem, why it happens, and how to fix:
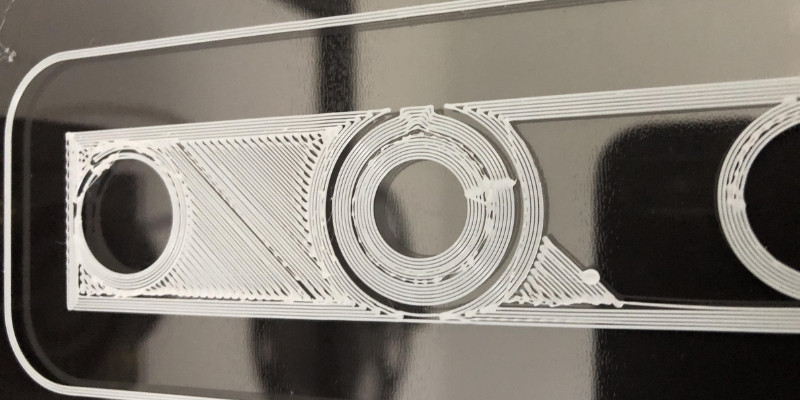
What Causes a Rough First Layer?
A rough first layer is caused when the printer’s nozzle is positioned too close to the print bed, catching on previous deposited filament and creating unsightly and uneven peaks, ripples, and mounds of filament that affect the overall quality of a print.
Start as you intend to go on, as the saying goes. Left unchecked, the problem can manifest in later layers, which in term may spoil the finish of the parts outer walls/shell. You want to aim for as even and uniform a first layer as possible.

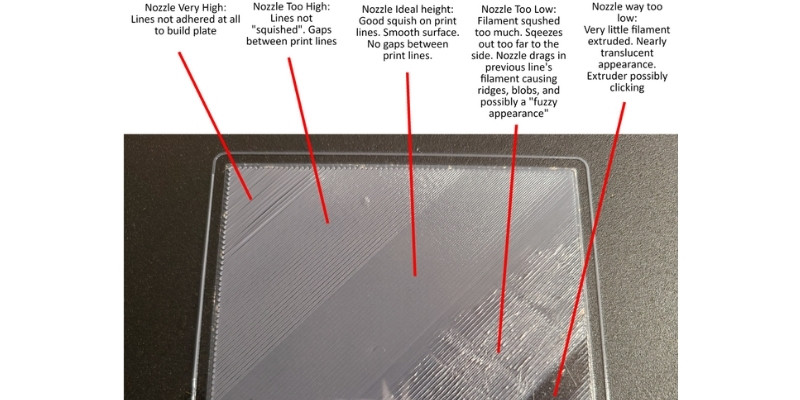
1. Nozzle too close to the bed
Signs that your nozzle might be too close to the bed:
- The printed line is way thinner than desired. It might get so thin that it turns transparent.
- Excess filament is squished upwards at the edges of the current printing line creating a rough surface and wavy patterns. (You can feel the roughness when touching it carefully even during the print.)
- Filament is getting torn off the bed when the next neighboring line is printed.
- Finished prints are hard to remove from the print bed.
Explanation:
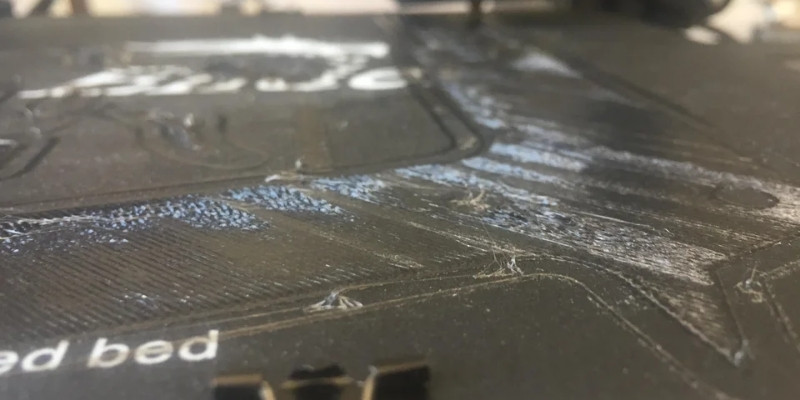
- If your nozzle is too close to the bed, there is not enough space to extrude the proper amount of filament. Excess filament is either squished upwards between individual printed lines or isn’t extruded at all, putting additional pressure in the hot end.
- Excess filament that gets squished to the sides and upwards might get torn off the bed on the next pass by the nozzle, destroying adhesion and making the top of your first layer very rough.
- Excess filament might also get picked up by the nozzle and could drip back on your print later. This is especially common for PETG.
- If filament backs up in the hot end because it can’t be extruded due to the nozzle being too close to the bed, your extruder might even get jammed and start clicking.
- Squishing your first layer too much into the bed can lead to prints that are almost impossible to remove from the build plate when printed. These prints can damage your bed when removed, too.
How to fix:
Firstly, ensure your bed is leveled correctly by either doing so manually, or better yet if the printer has it, run automatic bed leveling. After this, you’ll want to adjust the Z-offset, the distance between the nozzle and the print bed, the major concern when trying to eradicate a rough first layer.
We recommend the trusty old paper technique:
- Level the bed and return it to the home position of the Z-axis, then slide a standard piece of A4 printing paper between the nozzle and bed.
- Lower the Z-offset progressively (either in slicer, on the printer interface, or using G-code commands) until the paper is trapped under the nozzle.
- Raise the Z-offset until you only feel a slight resistance as you slide the paper back and forth under the nozzle.
- Once this is done, download an STL for a Z-offset calibration test. Thingiverse is packed with them, so take your pick, but we recommend Thingiverse creator zekettek’s version.
As the test runs, you can make minor adjustments to the Z-offset on the fly, until you’re getting smooth, even print lines.
Remember there’s a fine line between having the nozzle too close and too far from the bed, so don’t raise the Z-offset too high or you’ll open the door to a whole host of other issues linked to first-layer adhesion.
2. Nozzle too far away from the print bed
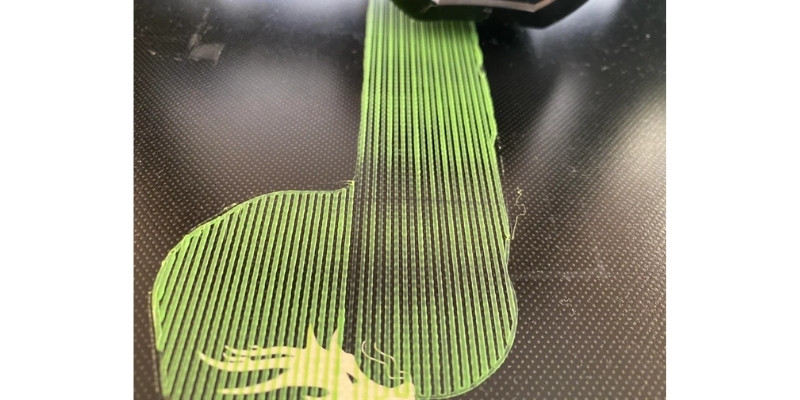
Signs that your nozzle might be too far away from the bed:
- When looking at the bottom of your printed object, you can clearly make out individual lines with a noticeable gap between each line.
- During 3D printing of the first layer, the individual lines don’t touch each other.
- There’s small gaps where the lines of the infill don’t touch the outlines of the wall.
- The shape of the extruding line is very round. With the proper distance, the extruded line of filament is slightly squished, and pancake-shaped.
- Individual printed lines barely stick to the build plate.
- Parts are warping off the build plate or become loose during the prints.
Explanation:
If your nozzle is too far from the bed, there is not enough filament extruded to properly fill the space between nozzle and bed.
The line currently extruding is barely making contact with the bed. Individual lines making up the first layer are not connected to their neighbors and they’re not touching the outlines of your object’s wall.
All this usually leads to poor adhesion problems like warping or the detaching of your object mid-print.
How to fix this first layer issue:
Adjust your nozzle to the correct bed distance either by tightening the 3 or 4 leveling screws of your printer and using thicker paper stock for manual bed leveling or by adjusting your z-offset value when using a bed leveling sensor. Make sure you’re not pressing down on your bed when leveling it.
If your printer has auto bed leveling, then use these features to correctly level the bed so that the nozzle is not too close.
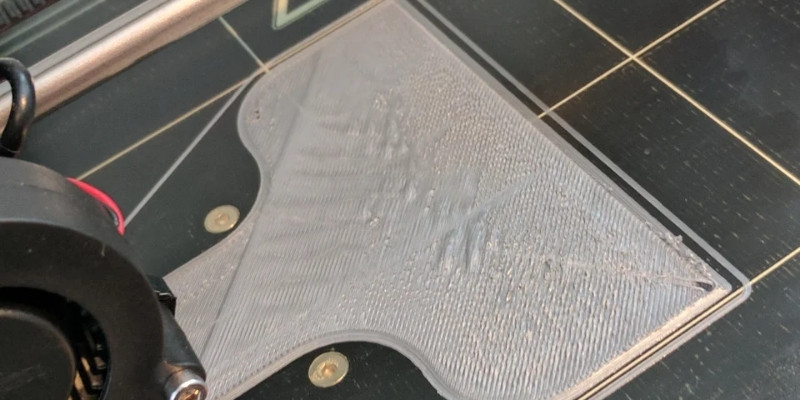
3. Print Not Sticking To Bed

Signs that your print isn’t sticking:
Your print is detaching from the bed, warping, curling, or, worse, isn’t adhering to the bed at all creating a tangled mess of wasted filament resembling a bird’s nest. The problem is easily diagnosed and you’ll generally know within minutes, if not sooner, if the first layer isn’t sticking to the bed.
Explanation:
There are three common reasons why a print isn’t sticking to the bed, all of which are linked to adhesion, or the capacity for the filament to correctly bond to the print bed.
First, insufficient heated bed temperature or nozzle – filament needs heat to remain in a malleable state to adhere to the bed as it’s extruded from the nozzle and lands on the bed.
Second, the print bed is dirt, caked over with foreign debris preventing the filament from adhering as intended. Natural oils from fingers and hands, dust, left over filament from previous prints, residual adhesive like glue, and general grime – these can all affect adhesion.
Lastly, the bed isn’t leveled correctly or the Z-offset isn’t set correctly. These are generally to blame if a print is sticking on parts of the bed but not others or the nozzle appears to be printing into thin air rather than onto the bed.
Read more: PETG filament not sticking to print bed
How to fix:
A fix for a surprising broad range of 3D printing issues, we recommend leveling the bed as your first port of call, whether manually or using automatic bed leveling features. A basic fix, but one that often gets overlooked when trying to troubleshoot complex problems.
Next, adjust the Z-offset – the distance between the nozzle and bed when the print head is homed – right after leveling the bed. We recommend the classic paper technique: slide it under the nozzle then lower the Z-offset until you feel a slight resistance, then run a calibration test (like this one) and adjust the offset until you get a smooth, uniform layer, free of bumps or ripples.
Clean the bed. Depending on the type of build plate (glass, steel, PEI-coated, etc.) the optimal cleaning regime differs, but for most a base damp rag or cloth does the job. For ingrained grime, isopropyl alcohol works well, but tread lightly so as not to damage the plate’s surface. If you have a removable bed, and the blessing from the manufacturer to do so, cleaning it with washing up liquid and hot water works well. Remember to dry off the plate completely before firing up the printer; water and filament don’t mix well.
Raise the bed temperature. It’s best to check the temperature range recommended by the filament manufacturer and start from there, then raise the temperature in small increments until you see improvements in first layer adhesion. Beyond a certain point – 65°C to 70°C – you can safely assume something else is causing the prints not to stick to the bed.
Though no fixes per se, but more workarounds, you can also add rafts to prints to help with adhesion or use third-party adhesives, like glue, painter’s tape, Magigoo, hairspray, and others. Use sparingly, aiming for a light layer.
Filament specific tips
- PLA likes to be squished more into the bed than other filament types to provide good adhesion.
- PETG usually prints better with a higher nozzle to bed distance to avoid the nozzle picking up filament that might drip on your print later during the print. Also, the extra distance helps prevent excessive adhesion issue that for example might occur when printing on glass or PEI beds.
- TPU and Flexible PLA will also adhere stronger than you might like if printed too close to a PEI or specialist bed surface (such as BuildTak).
4. Use The Right Bed Adhesion
Signs that you aren’t using the right bed adhesion:
If you’re using an adhesive to encourage better bed adhesion and the 3D print first layer still isn’t sticking properly to the bed, it’s likely you’re using the wrong adhesive.
Explanation:
Different bed surfaces and filaments have different requirements when it comes to bed adhesion. This is linked to their thermal properties and the qualities of the surface used.
The goal of using an adhesive is to promote better first-layer adhesion by creating a sticky layer on the build plate.
If the incorrect adhesive or even any adhesive is used with the wrong type of build plate, then the adhesive won’t help improve adhesion.
How to fix:
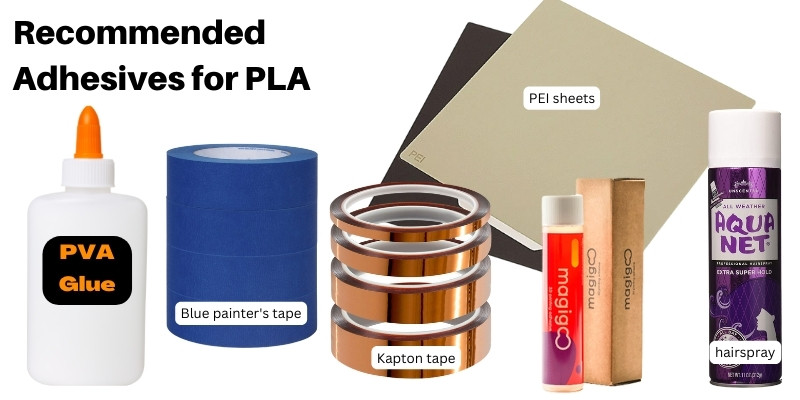
Use the right adhesive, as follows:
- PLA: PVA glue, Kapton tape, blue painter’s tape, Magigoo, PEI sheets, hairspray
- ABS: PVA glue, Kapton tape, blue painter’s tape, Magigoo, PEI sheets, hairspray
- PETG: Superglue, Gorilla glue, Magigoo
- TPU: PVA glue, Blue painter’s tape
Though PLA and ABS can generally be printed without adhesive on heated build plates, PETG and TPU nearly always benefit from some adhesive help.
5. Slow down first layer speed
Print speed can also affect first-layer adhesion.
Explanation:
Set the print speed too fast and the filament doesn’t have time to cool sufficiently to bond to the bed causing it to detach from the bed almost immediately and create a messy bird’s nest of filament. The problem is especially pronounced when other settings aren’t dialed to promote strong first layer adhesion, compounding the issue.
How to Fix:
To fix the issue, you’ll want to slow down the print speed. Rather than slowing down the entire printing process, jump into your slicer settings and adjust the initial or first-layer heights (different programs have different names for the setting).
We recommend starting slow, at around 30 to 40 mm/s, then lowering in small increments until you see an improvement in first-layer adhesion. Once the first layer is firmly rooted to the bed, the printer can then ramp up the print speed for subsequent layers.
Slowing down the first layer print speed adds a little more time to the print process, but is well worth it. As we’re dealing with the first layer, you can test different speeds quickly as you only need to monitor the printer as the first layer goes down.
6. Use Brims and Rafts
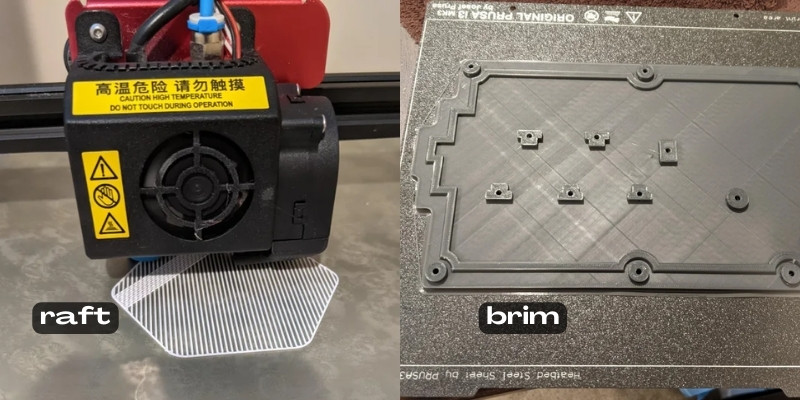
Signs that You Need to Use Brims, Rafts, Skirts:
If you’ve tried all the other most common first layer issue fixes and are still having trouble finding good adhesion, then it may be an option to use an in-slicer adhesion helper, specifically brims and rafts.
Explanation:
A brim is a short edge, usually no more than a few lines that sits around the base on the print’s first layer, helping to improve adhesion by offering a broader and stronger bond to the build plate.
Rafts work in a similar fashion, but adds an entire layer below and around the print’s first layer to create a foundation or base structure to promote strong first layer adhesion.
Skirts deposit a small segment of filament, usually a line or two around the print without touching it. They are useful not just to purge the first few stringy bits of filament emerging from the nozzle, but also to pick up on any potential 3D printing first layer problems before the print starts in earnest.
How to Fix:
Rafts, brims, and skirts are also configurable in your slicing software. You set the size, print speed, and other parameters to fine-tune them to your liking and allow you to test what works best for your particular project.
You’ll consume more filament, but it’s worth it for the peace of mind of almost guaranteed first layer adhesion.
We recommend starting with a skirt to pick up on any early signs of issues, then pivoting to a brim, and finally, if those don’t bear fruit, going for a raft.
7. Check You Have the Right Temperature Settings
Signs You Don’t Have the Right Temperature Settings:
A clear sign that your bed temperature is to blame for first layer issues is if the filament isn’t failing to stick properly to the bed. This can range from partial adhesion to the filament failing to stick to the bed at all, to the first layer detaching from the print bed when the printer deposits subsequent layers.
Explanation:
Filament is reliant on the right thermal environment to stick to the bed properly. If the bed temperature is set too low, the filament will cool down before it’s able to bond with the bed surface. By remaining malleable and soft for longer, the filament has more time to stick to the bed properly.
How to Fix:
You can adjust bed temperature in your slicer settings. We recommend sticking with the manufacturer recommended range, then raising the temperature in small increments until the adhesion issues disappear. In most slicers, you can even set a specific first layer temperature, allowing you to further fine tune the printer to secure a solid first layer before lowering the temperature for the layers that follow.
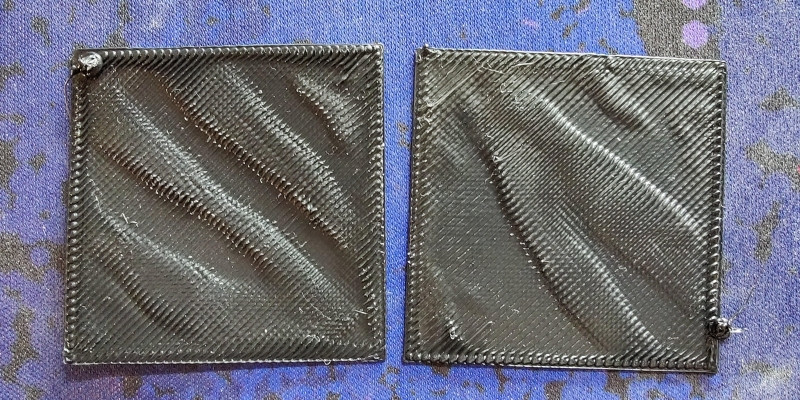
Be wary about cranking up the temperature too high as doing so can cause other issues such as elephant’s foot, whereby an insufficiently cooled, and therefore, soft first layer bulges outwards as the pressure from subsequent layers pushes down on it.
First Layer 3D Printing Tips for Specific 3D Printers

- Prusa MK2/MK2S: The Prusa’s PINDA sensor is temperature sensitive and will give false readings if the probe is heated before the mesh bed leveling. Raise your probe a good distance off the bed during the preheat before mesh leveling at the beginning of a print.
- Creality CR10/Tevo Tornado: Both printers come with a fairly large bed. And they’re not necessarily the flattest. Try leveling the bed not at the outermost corners but rather a bit further in.
- Wanhao i3: Keep your hands well away from the bed while feeling the paper dragging during the leveling process. The stock bed frame is rather flimsy and looking at it sternly screws up the results. Repeat leveling procedure at least 3-4 times or more to make sure it stays level. Try leveling at full printing temp, use Preheat in the menu.
- Tevo Tarantula: The green stock SN04 sensor is unreliable. Level manually and keep your hands well away from the bed while feeling the paper dragging during the leveling process. The stock bed frame is rather flimsy and looking at it sternly screws up the results. Repeat leveling procedure at least 3-4 times or more to make sure it stays level. Try leveling at full printing temp, use Preheat in the menu.
- Ultimaker 2/2+: The bed carrier flexes a lot when turning the leveling screws, especially the ones in the front. Keep hands clear. Don’t bother with the bed level assistant, just run through it and do the rest manually.
- Ender 3: The coupler connecting the Bowden PTFE tubing to the hot end is known to be of poor quality, allowing the tube to slip as it exits the extruder, which can affect extrusion, which in turn can lead to first layer issues. Replace the coupler with a more reliable alternative.
How Do You Improve the First Layer of a 3D Print?
First, make sure your bed is correctly level, either by leveling it manually or using an in-built automatic bed leveling system if you have one.
After leveling, adjust the Z-offset to ensure the nozzle is neither too close or too far from the bed.
Thirdly, ensure the heated bed temperature is set within the range recommended by the filament manufacturer. Don’t hesitate to raise the temperature in small increments to improve first-layer adhesion.
Cleaning the build plate regularly to remove any filament residue, dust, grime, and natural oils is also recommended to improve the first layer.
If all these don’t help, consider using an adhesive such as glue, tape, or hairspray, and slicing your models to include rafts, brims, and skirts.
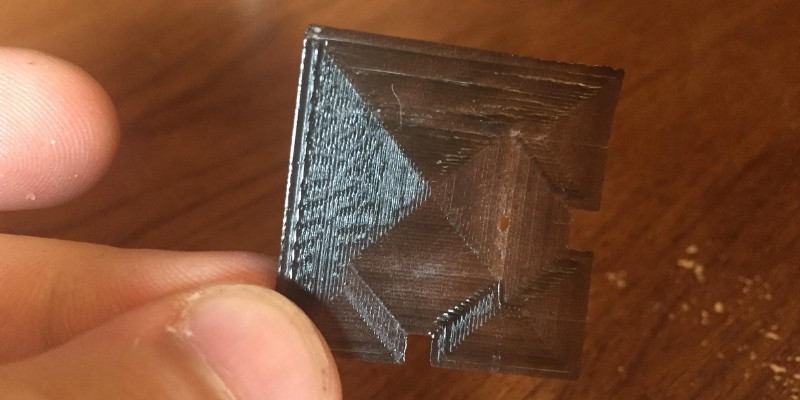
What Should a First Layer Look Like in 3D Printing?
The first layer in 3D printing should look like a smooth and neat collection of slightly overlapping extrusions that bond uniformly to one another and are free of bumps, peaks, and other blemishes. The lines should be squished onto the build surface so that there are no holes or gaps between them, but not enough to cause bulges, flare outs, or bubbles. A consistent pattern is a sign of a perfect first layer.
What Causes Ripples in the First Layer of a 3D Print?
Ripples on the first layer of a 3D print is a sign that the nozzle is positioned too close to the build surface. You can fix this by adjusting the Z-offset and setting the nozzle closer to the bed, but not too close or you’ll usher in a new set of problems, including elephant’s foot.
What Is the First Layer of a 3D Print?
The first layer of a 3D print is the initial layer that’s deposited onto the build surface at the start of the 3D printing process. The first layer is the foundational layer upon which the rest of the print depends. A solid first layer sets up a print for success.
How Thick Should the First 3D Print Layer Be?
There’s no blanket answer to this as it depends on many factors including the diameter of your nozzle, what type of filament you’re using, and the size of part/model you are printing. For most hobby projects using PLA, we recommend a 0.2 mm initial layer height, but adjust this based on results.
Read more: best layer heights for 3D printing
How to Slow Down the First Layer in a 3D Print?
You can adjust the first layer or initial layer print speed in your slicer software before sending the sliced file to your printer for printing.
How Do You Make the First Layer of a 3D Printer Stick?
To make the first layer of a 3D printer stick, there are several steps. First, level the bed and set the Z-offset. Cleaning the print surface also helps as does using an adhesive such as glue, hairspray, or tape. You may also want to slow down the first layer print speed and adjust the bed temperature higher to allow the filament enough heat to bond with the bed before cooling.
Related posts:
- Best Hairspray for 3D Printing
- Best Affordable Auto Leveling 3D Printers
- What is a 3D Printing Raft, Brim or Skirt
- How To Fix PETG Not Sticking to the Print Bed
- 3D Print Not Sticking To Bed: All Problems Fixed
- How To Fix PLA Not Sticking to the Print Bed
- How To Fix Under Extrusion Problems or Clicking Sounds?
- Prints Pillowing, 3D Printer Stringing and Layers Splitting
- All Fixes for Filament Sticking to PTFE Tube


