How to Anneal 3D Prints for Strength (Nylon, ABS & PLA)
At 3DSourced we’ve covered everything 3D printing and 3D since 2017. Our team has interviewed the most innovative 3D printing experts, tested and reviewed more than 20 of the most popular 3D printers and 3D scanners to give our honest recommendations, and written more than 500 3D printing guides over the last 5 years.

*(Nobody loves the smell of heated plastic; always print and anneal in well-ventilated areas)
Depending on the object that you’re creating and its end purpose, sufficient strength and stiffness can sometimes be difficult to achieve.
One of the best ways to increase the stress tolerance of your printed objects is by annealing your 3D prints.
Through a relatively simple process, you can actually turn a standard material like PLA into one of the strongest 3D printer filaments.
In this guide, I’m going to explain what 3D print annealing actually is, and provide step-by-step guides for annealing Nylon, PLA or ABS in a simple kitchen oven.

I’ll share all the tips I’ve learned to avoid common beginner mistakes and help you strengthen your prints with confidence – so let’s get on with it!
How To Strengthen 3D Printed Parts With Annealing
What Is Annealing?
Annealing is an ancient process, originally used in metallurgy to increase the strength of metal objects. Annealing is one of several “heat treatments” that are used to change the physical properties of metal without changing the metal’s existing shape.
In essence, annealing increases the ductility of a given metal.
The fundamentals of the annealing process have been adapted for use with plastics, but instead of softening them, the process is used to increase their strength and stiffness after an object has been formed.
However, when dealing with plastics, the process is not actually annealing – it’s just many years ago someone coined the term when describing this process in plastics and the name appears to have stuck.
Confused yet? Don’t worry, we’ll explain all.
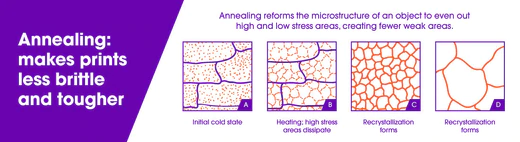
Perhaps a more accurate name should have been ‘stress mitigation’ because as we’ll read below, you’re essentially reducing the stress in highly affected areas and dissipating this out more evenly through the print, making it less likely to fracture at any specific point.
Primarily an industrial plastics technique used as a finishing process, annealing can also be used by anyone with access to a kitchen oven to harden 3D prints.
How Does Annealing Work?
In metallurgy, the process of initially molding and forming a metal object causes crystalline structures, called “grains”, to form within the metal. These grains tend to be large when cooled very slowly and small if cooled quickly.
More often than not, the metal is cooled quickly, forming smaller grains. As a result, the metal is hard but brittle and will crack under stress along the juncture lines between individual grains.
Annealing with metal involves reheating the metal to a temperature below its melting point and then allowing it to cool slowly. This reheating causes larger crystals to form, ‘growing’ from the original grains.
This larger crystalline matrix makes the metal softer and increases ductility. The metal’s shape hasn’t changed, but its characteristics have.
With plastics, the process is a little different. FDM printing necessarily involves heating the print material so that it can be extruded. Once extruded, the material then cools to form the printed object.
Plastic is a fairly poor conductor of heat. This means that heated plastic tends to cool unevenly. This uneven cooling introduces stress into a printed object naturally increased by the print’s layered construction. Let’s take a closer look at the nature of this stress.
As you may know, most thermoplastics used in FDM printing are polymers. A polymer consists of two or more substances. Each substance is made up of long molecular chains. These chains are interwoven around each other, creating the polymer.
At a microscopic level, the structure of the plastic is typically unorganized and rather amorphous. When printed, it is likely to induce banding – small crystals where the plastic cools quickly, and larger where it is a slower process.
Uneven cooling due to poor heat conduction results in the polymer shrinking in different ways. This, in turn, causes different tensile forces and compression forces building up in the polymer structure.
Annealing plastic involves gently reheating the substance to its glass transition temperature or just above, but below its melting temperature, holding it there for a time, and then slowly allowing it to cool.
Like the annealing of metal, this reheating and extended cooling increases the amount of large crystalline structures in the plastic and redistributes the stresses within the printed part.
Note: While we’ll explain the temperatures to anneal for each material, these are approximations. The ‘same’ material from different suppliers can have slightly varying glass transition temperatures, and ovens can typically have thermostats that are +/-10% out.
So please treat these temps as a guide only, and try it on a scrap print beforehand. You don’t want to warp a print from annealing at a too-high temperature.

Also, when the polymer approaches or reaches its glass transition temperature, the molecular chains have enough energy to become more amorphous. At this temperature, they are able to rotate, move, stretch, etc. and this releases some of the tensile and compression forces that resulted from uneven cooling.
Being a plastic made up of polymers, the process does not work quite the same way as it does with metals, so instead of getting a soft and ductile object at the end, you end up with a plastic that is stronger, stiffer and more resistant to the stresses that cause failure.
So really, it shouldn’t be called annealing, but ‘toughening’.
Now that you know what annealing is and how it works to make the strongest 3D printing material, let’s take a look at the specific techniques that you can use to anneal objects printed from some commonly used thermoplastics.
Note: We hold no responsibility for any incidents that may happen if you leave plastic in ovens. Ensure you don’t leave it unattended, adhere to sensible temperatures advised and ensure plenty of ventilation. In short, please exercise common sense with annealing plastics.
How to Anneal PLA
PLA tends to be strong but can be somewhat brittle. It also has a relatively low melting temperature. Both of these facts make it an excellent candidate for annealing. Its low glass transition temperature makes it easier to anneal. In addition, annealing reduces the brittle tendencies of PLA by increasing ductility.
In effect, annealing is the best way to make the PLA strength better.
PLA heat resistance is low, virtually the lowest of any 3D printing material. The glass transition temperature of regular PLA is 60C to 65C (140F to 150F). Ours is about 6C lower than that due to the grade we use. Its melting temperature is 173C to 178C (343F to 352F). Therefore, you want to set your oven temperature to about 55-65C when annealing PLA.
In some instances, you may need to increase the temperature depending on your oven and the material used to 70C.

It’s worth noting that our PLA is a lower temperature grade, so annealing would be best done around 60C. Again, you just need to experiment first as your oven can likely run a little hotter or cooler than the temperature it states.
Generally, if your PLA requires a higher printing temperature, it’s of lower quality. Different ovens have different accuracy in thermostats, so it’s always worth testing with a scrap print first.
If you’re looking to make the strongest prints, you’re best off starting with the strongest PLA filament.
But enough about us…
At 60°C, it’s high enough to allow the baking PLA to soften and become amorphous, releasing some of the stress caused by printing and allowing the polymer strands to rearrange. It is also low enough that the PLA will not melt and flow, losing its shape.
Let the oven come to temperature and then let it sit for about an hour. This waiting period will help ensure that the oven temperature is as uniform as possible, preventing hot and cold spots that can negatively affect the annealing process.
Use an accurate thermometer to confirm that the oven is at the correct temperature before putting your PLA object in the oven.
It should be noted here that when annealing PLA plastic, or any other filament, ovens with convective heating (fan oven) will produce superior annealing results for the same reason that it produces superior bread.
Instead of the heat radiating from one direction, a convective oven circulates heated air around an object, providing a 360° heat source that produces more uniform results.
Note: It’s important you never try annealing prints in a gas-fired oven. The reading may be X degrees, but the flames themselves will be much hotter – potentially melting or setting fire to your prints. Only anneal in an electric oven, and always ensure the heating elements are turned off before placing your prints in. Again, heating elements can get much hotter than the oven reading.

Once the oven is at temperature, place your PLA object(s) on an oven-safe surface and put them in the oven, turning it off and leaving your prints in there until it has cooled. This should be at least an hour or two.
This will give the objects enough time to absorb enough heat energy to allow the polymer chains to move, stretch and realign, and recrystallize, forming a sturdier internal matrix. Do not open the oven door during this time, as any loss of heat will result in inferior annealing results.
As the oven gradually loses heat, so will the object or objects. A gradual cooling process will avoid a reoccurrence of the internal stresses that occurred during the more abrupt cooling that happened after printing. It will also reduce incidents of warping which can still occur at annealing temperatures.
Once the oven is back at room temperature, remove the object(s). What you will notice is that the object(s) will have shrunk slightly along the line of its print layers. In addition, you will also notice some expansion perpendicular to the print line.
In other words, the dimensions along the X and Y coordinates will have gotten smaller, while the Z dimension will have grown.
These changes are due to the changes in tension, or rather the changes caused by the release of the internal tensile and compressive forces discussed above. On average, you’ll see PLA shrinkage of about 5% and growth of about 2% along the relevant axes. If this shrinkage and growth is going to be a problem, you can compensate for it beforehand during the design and printing processes.

After heat-treating PLA, you can expect to see some significant improvements in the strength of your PLA object. A 40% increase in strength and durability is not uncommon. Likewise, you can also expect to see a good improvement in stiffness. A 25% improvement here is not unexpected.
Finally, the stability of the annealed PLA at higher temperatures will also be improved. So, if you need stiff, high-tensile PLA parts with good heat resistance, annealing can be the answer.
If you want to learn more about printing with PLA filament, click here.
How to Anneal ABS
ABS tends to be stronger and less brittle than PLA. It also has a higher melting temperature than PLA. Despite these facts, ABS is also an excellent candidate for annealing.
While ABS will need to be annealed at a higher temperature than PLA, due to its higher glass transition temperature, the annealing process will provide ABS with the same increases in desirable material properties that were seen with PLA.
The glass transition temperature of ABS is 105C (221F). Its melting temperature is 210C to 240C (410F to 464F). Because of this, you want to set your oven temperature to around 100C (210F). Again, this temperature is high enough to allow the material to soften which will release the stress caused by extrusion while increasing crystallization.
If you want to try higher ABS annealing temperatures you can do, but you may find warp and deformation increase. As was the case with PLA, it is also low enough so that the material will not melt, flow, or significantly deform.
As always, let the oven come to temperature and then let it sit for about an hour in order to ensure temperature uniformity. Use an accurate thermometer to confirm that the oven is at the correct temperature before putting your ABS object in the oven. As with any annealing project, a convection oven is always preferable.
When the oven is at temperature, place your ABS object in the oven on an oven-safe surface for 30 minutes, plus an additional 15 minutes for every 3mm (1/8 inch) of object cross-section.
Again, this will give the object enough time to absorb enough heat energy to allow the polymer chains to move, stretch and realign, and recrystallize, forming a sturdier internal matrix. As always, do not open the oven door during the annealing process.
Once the time is up, turn the oven off, leaving your object in the oven. This gradual cooling process will reduce warping and the reoccurrence of internal stress caused by abrupt cooling.
Once the oven is at room temperature, remove your objects. Once again, you may notice shrinkage and growth along the X, Y, and Z axes. As was the case with PLA, this shrinkage can be compensated for in the design and printing processes.
Also expect to see an improvement in the strength, stiffness, and stability of the annealed object, along with improvements in temperature stability.
How to Anneal Nylon
Nylon 12 is stronger and less brittle than either PLA or ABS. Its melting temperature is higher than ABS. Annealing can significantly increase its heat deflection temperature. When you combine this with its high strength, annealed Nylon 12 makes a great choice for applications where heat and durability are issues.
The glass transition temperature of Nylon 12 is around 98C (208F). However, its melting temperature is a respectable 178C-181C (352F to 358F). Because of this, you want to set your oven temperature to 130C-140C (266F to 284F).
Again, this temperature is high enough to allow the material to soften which will release the stress caused by extrusion while increasing crystallization.
As is always the case when annealing plastics, it is also low enough so that the material will not melt, flow, or significantly deform.
Again, once the oven is at temperature let it sit for an hour for the sake of temperature uniformity. Use an accurate thermometer to determine temperature prior to starting the annealing process and use a convection oven if possible.
Place the nylon object on an oven-safe surface and put it in the oven for two hours. This time is necessary to allow polymer chain realignment and recrystallization. Don’t open the oven while annealing is underway.
When the two hours are up, turn the oven off, leave the object inside, and let the oven cool incrementally to room temperature. This is to reduce warping and maximize the benefits gained through annealing.
When the oven is at room temperature, remove your objects. Once again, you may notice shrinkage and growth along the X, Y and Z axes. As was the case with PLA, this shrinkage can be compensated for in the design and printing processes.
While you will see a slight improvement in strength, the real improvement will be in temperature stability. Annealing generally increases a nylon object’s heat deflection temperature by over 40%.
The method for annealing Polycarbonate prints is a similar process, using temperatures in the 120-130C range. Polycarbonate although has a higher printing temperature, its softening range is much greater than other materials.
Summary
Annealing is a fantastic, underutilized method of increasing strength and durability in your thermoplastic 3D prints.
Looking for these properties in your prints, you really want to start off with good quality filament. Using high-quality materials will naturally give your parts excellent desirable properties to begin with, only to be further enhanced with the annealing process.
Related articles:


