Best Ender 3 Cura Profile Settings (V2/Pro/S1/Neo)
At 3DSourced we’ve covered everything 3D printing and 3D since 2017. Our team has interviewed the most innovative 3D printing experts, tested and reviewed more than 20 of the most popular 3D printers and 3D scanners to give our honest recommendations, and written more than 500 3D printing guides over the last 5 years.
As one of the best-selling printers of all time, the Ender 3 and its successors, including the Ender 3 V2, Ender 3 Pro, and more recently the Ender 3 S1 and Ender 3 Neo, are favorites among newcomers and seasoned makers alike. It’s well-priced, versatile, and offers a gentle introduction to 3D Printing. But, as with most 3D printers, the Ender 3 takes some targeted tweaking and slicer setting adjustments to get the most out of it, notably in the ever-popular Cura.
In this guide, we’ll cover the best Cura profile settings for Ender 3, touching on parameters like print speed, infills, temperatures, different filaments, and much more to help you tune the very best Cura profile.
What Are the Best Cura Settings for Ender 3?
Print Speed
| Stock profile setting | 50 mm/s |
|---|---|
| Recommended for PLA | 50-80 mm/s |
| Recommended for ABS | 40-60 mm/s |
| Recommended for TPU | 10-30 mm/s |
| Recommended for PETG | 20-40 mm/s |
Print speed is arguably the most important slicer setting, with a huge effect on both print times and print quality. Slower speeds tend to produce better details, surface finish, and overall quality – but extends print times.
For standard filaments like PLA and ABS, a print speed of 50-60 mm/s offers a strong balance of quality and speed. If you’re working with large parts or models and quality isn’t all that important, don’t hesitate to increase print speeds up to 80 mm/s and even higher, though expect blemishes and imperfections as a result.

These recommendations apply for all Ender 3 models including the newer Ender 3 S1 and Ender Neo models. For more specific advice, we also have an article on Ender 3 print speeds.
Hot End Temperature
| Stock profile setting | 200 °C |
|---|---|
| Recommended for PLA | 200 °C |
| Recommended for ABS | 210-250 °C |
| Recommended for TPU | 210-230 °C |
| Recommended for PETG | 220-250 °C |
The correct temperature settings in your Cura profile is vital. The wrong parameter can condemn a print to failure before it’s even started, causing blemishes, poor layer adhesion, and extrusion issues.
Above are our recommendations for each filament type, though we highly suggest following the manufacturer’s recommendations for your specific brand of filament for the best results. If you’re not getting good results, adjust the temperature in small increments of 5°C until you see improvements.
For PLA, 200°C tends to get the best out of the Ender 3. Note that the original Ender 3’s nozzle temperature is capped at 240°C, slightly below the upper limit for ABS and PETG, so, depending on the brand, it may struggle to hit the optimum temperature for those filament types.
All other Ender 3 models (S1, Neo, Pro, V2, Max) push a 250°C nozzle temperature or higher, covering all the most popular material types.
Print Bed Temperature
| Stock profile setting | 60 °C |
|---|---|
| Recommended for PLA | 50-60 °C |
| Recommended for ABS | 100-110 °C |
| Recommended for TPU | 60 °C |
| Recommended for PETG | 60-70 °C |
There’s no universal best bed temperature setting for the Ender 3 – the right temperature is contingent on the type of filament being printed.
Also, though we can estimate ballpark heated bed temperature ranges for each filament, these can vary between brands, so double-check manufacturer recommendations.
The above recommendations apply to all Ender 3 models, as all variants, including the Pro, S1, Neo, Max, have a heated bed.
For ABS, you’ll want to pair a 100-110 °C bed temperature with an enclosure for your Ender 3, such as a DIY tent or even one of Creality’s own pop-up chamber tents. The idea here is to remove temperature fluctuations caused by gusts and natural shifts in ambient temperature to maintain a stable thermal environment for ABS to perform at its best.
Layer Height
| Stock profile setting | 0.20 mm |
|---|---|
| High-quality prints | 0.08 – 0.12 mm |
| Fast prints | 0.20 – 0.24 mm |
Layer height determines not just the richness or detail and features, but also overall print times. This is because dialing in a smaller layer height means more layers to complete a print, and, therefore, longer print times.
As such, the balance is between quality and print times, so the optimal layer height depends more on your needs, expectations, the type of print, and its application.
For example, a decorative piece with lots of surface details will benefit more from a lower layer height, while a large, functional piece subject to wear and tear is best printed with a higher layer height to reduce print times but also because aesthetics aren’t all that important.
For the Ender 3, layer heights are best dialed in increments of 0.04 mm because the Ender 3’s z-axis stepper motor moves by a multiple of that distance per step. This is down to the way the threaded rod lifts the x carriage per revolution and how that relates to the number of steps per rotation.
Retraction
| Stock profile setting | 5 mm at 45 mm/s |
|---|---|
| Recommended for Bowden Ender 3 models | 5-6 mm at 25 mm/s |
| Recommended for Direct Drive Ender 3 models | 0.8 mm at 35-45 mm/s |
Retraction determines by what distance and at what speed the extruder pulls back filament into the nozzle during non-printing travel movements.
Retraction settings oozing, stringing, and other forms of excess filament deposition, aiming to produce sharper and overall higher-quality prints with fewer artifacts and unsightly material build-up.
Again, the right settings depend on your filament type, and which Ender 3 you have. The Bowden extruder Ender 3s, including the Ender 3, Ender 3 Neo, Ender 3 Pro, Ender 3 V2, and Ender 3 Max require a shorter but slower retraction to compensate for the longer filament path through the tubing.
While Ender 3s equipped with the Sprite Direct Drive extruder setup benefit most from a longer retraction distance and faster retraction speed to make the most of the precision of the onboard print assembly extruder. For upgrading, we also have an article on Ender 3 direct drive upgrades.
For stringing-prone filaments like TPU and PETG, a tighter retraction distance, as low as 4 mm, works best, with the speed dialed around 25 mm/s.
Retraction can be quite temperamental, so it’s worth dialing in these general settings, then running stress test prints and adjusting up/down in small increments until you eliminate most, if not all, instances of stringing. We’ve also written an in-depth article on Ender 3 retraction settings.
Infill Density
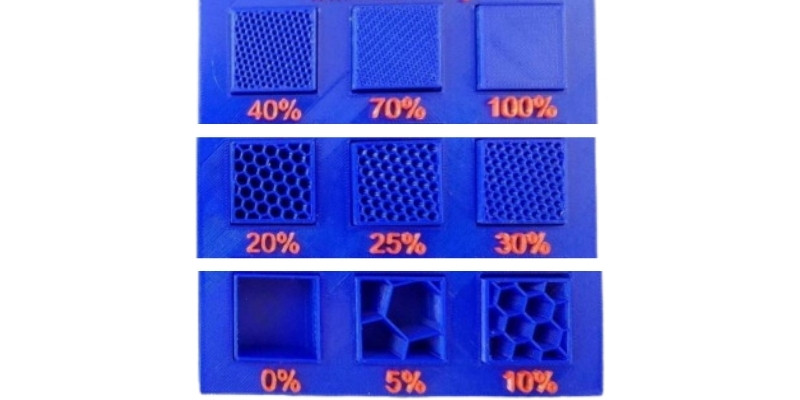
Infill refers to the innards of a print, and infill density in particular, measured as a percentage, determines how much filament and what pattern is used to create the infill.
As with other settings like bed temperature and hot end temperature, the ‘best’ infill density is print specific.
For display pieces destined for a life on a shelf, use a lower density. This will cut down on filament usage and print times. Typical densities for these types of prints range anywhere from 0% (check out Cura Vase Mode, for example) up to 15-20% for more durable models.
As for more functional models and parts subject to wear and tear or regular handling, then a higher infill density improves overall structural integrity, strength, weight, durability, and longevity. Common infill density for these types of prints is usually above 50%. But for Ender 3 infill Cura settings, this will be rare.
There’s also an in-between for prints that don’t quite fall into either category, with densities ranging between 15% and 50%. As you can see, this variety means it’s hard to know the best infill density without knowing the specifics of a project and the target application.
Infill Patterns
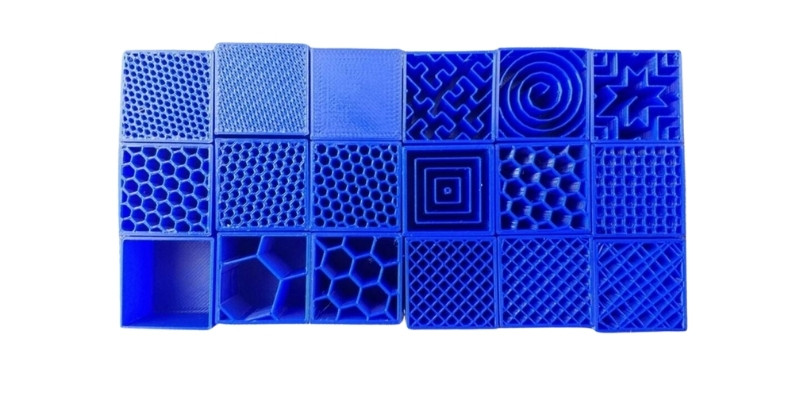
Diving into Cura’s infill patterns reveals a selection of options, 14 different patterns to be exact. Not all of these are created equal, nor are they suited to all types of prints.
The pattern dictates the shape of the infill, and affects the print’s overall strength and flexibility, and how much filament is required.
Here’s a breakdown of the different attributes of the most popular infill patterns found in Cura:
| Attributes | Infill patterns |
|---|---|
| Strength | Cubic, Octet, Gyroid |
| Regular Prints | Triangles, Grid |
| Decorative Prints | Lines, Zig-Zag, Lightning |
| Flexibility | Cross, Cross 3D, Concentric |
| Speed | Lines, Lightning |
Unless you’re determined to have strength or flexibility in a print, then standard infill patterns like Triangles, Cubic, Lines, and Zig-Zag will work for the majority of prints.
Initial Layer Print Speed
Initial layer speed is similar to the global print speed, except that it relates only to the first layer laid down by the printer.
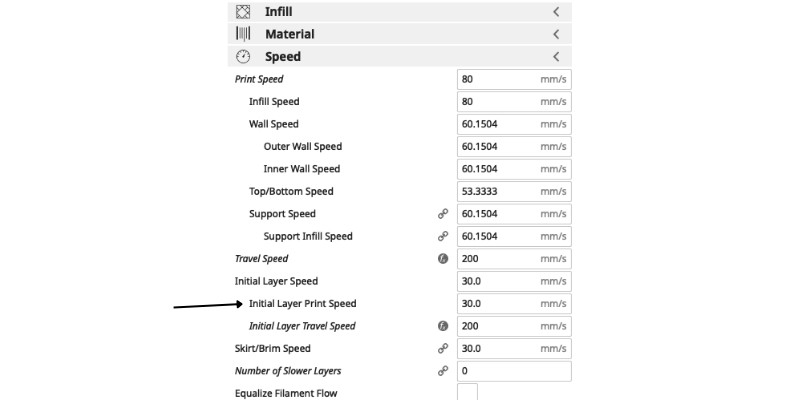
A lower initial layer speed promotes better adhesion, setting the rest of the print up for success. If you’re struggling to get a clean first layer down, this is the setting to save the day.
We recommend dropping it down to around 25 to 30 mm/s for the best results, as the slower speed allows the filament to create a much stronger and more durable bond to the bed and between those first few layers.
As the setting only affects the first few layers, it doesn’t increase overall print times by much at all, so it’s well worth slowing down to avoid print failures and errors later on.
Initial Layer Height
As a general rule, you’ll want an initial layer height larger than the global layer height, typically somewhere around 0.20 mm. We also recommend tuning the Initial Bottom Layers to 5 or 6 layers to nail that bed adhesion.
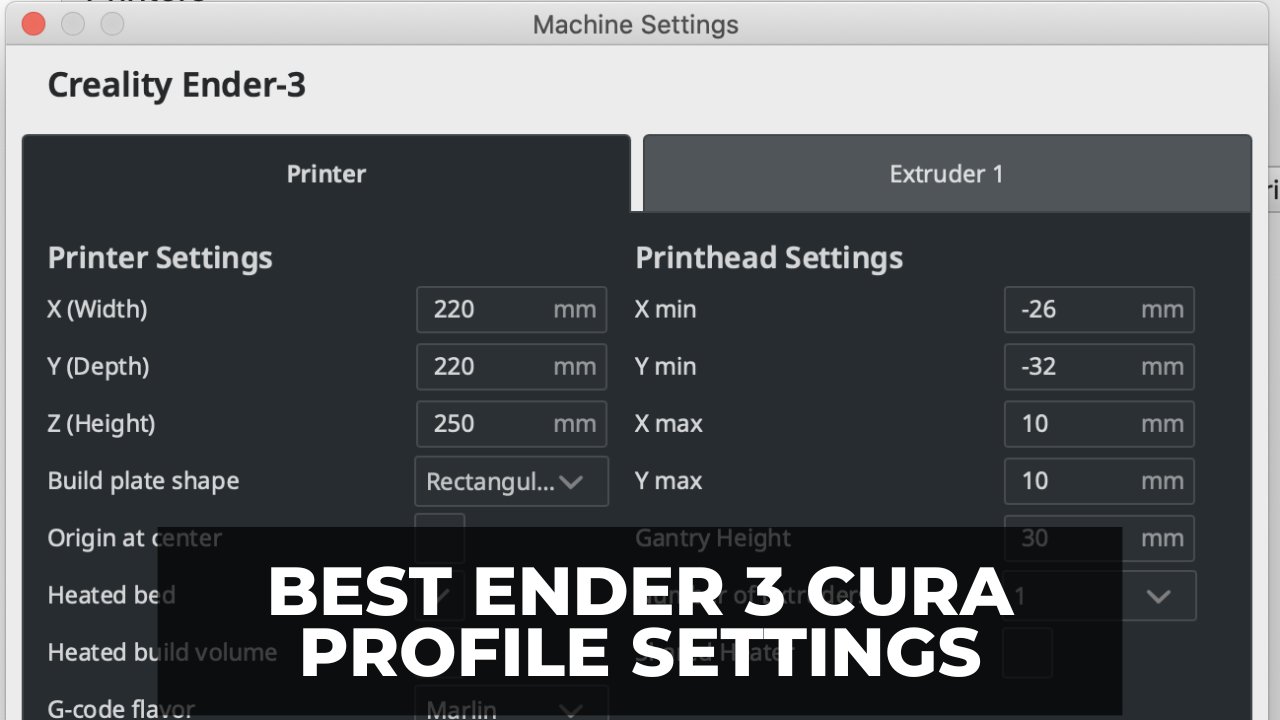
Where is Ender 3 on Cura?
To find the Ender 3 profile in Cura:
- Open Cura
- Tap on Settings, then select ‘Add Printer.’
- Click on ‘Add a non-networked printer’ to expand a list of printers.
- Scroll down and click on ‘Creality3D’.
- Select the Ender 3 from the list of options, and tap the ‘Add’ button.
- On the next screen, make sure the build volume, heated bed, etc. line up with your printer’s specifications, then click the Next button.
Alternatively, you can also find the Ender 3 on Cura this way:
- Open Cura
- Tap on Settings, then select ‘Manage Printers.’
- Click on ‘Add a non-networked printer’ to expand a list of printers.
- Scroll down and click on ‘Creality3D’.
- Select the Ender 3 from the list of options, and tap the ‘Add’ button.
- Tap ‘Next.’
FAQs:
Does Cura Work with Ender 3?
Yes, the Cura slicing software is indeed compatible with the Ender 3. Ultimaker’s popular slicer even includes a pre-configured stock profile for Creality’s flagship printer and the Ende 3 Pro variant. These profiles offer an excellent starting point, from which you can tweak and adjust the Ender 3 settings to suit your needs, project, and filament type.
What Speed is Ender 3 Cura?
The default speed for the stock Ender 3 profile in Cura is dialed to 50 mm/s. This is a solid average speed that should be ideal for a wide range of models and parts printed using filaments like PLA and ABS. That said, common Ender 3 speeds in Cura sit somewhere between 40 mm/s and 70 mm/s. If you’re printing with flexibles, we recommend lowering the print to around 30 mm/s to reduce instances of stringing and to get the best results.


