How to Fix Resin Prints Sticking To FEP Instead of Build Plate
At 3DSourced we’ve covered everything 3D printing and 3D since 2017. Our team has interviewed the most innovative 3D printing experts, tested and reviewed more than 20 of the most popular 3D printers and 3D scanners to give our honest recommendations, and written more than 500 3D printing guides over the last 5 years.
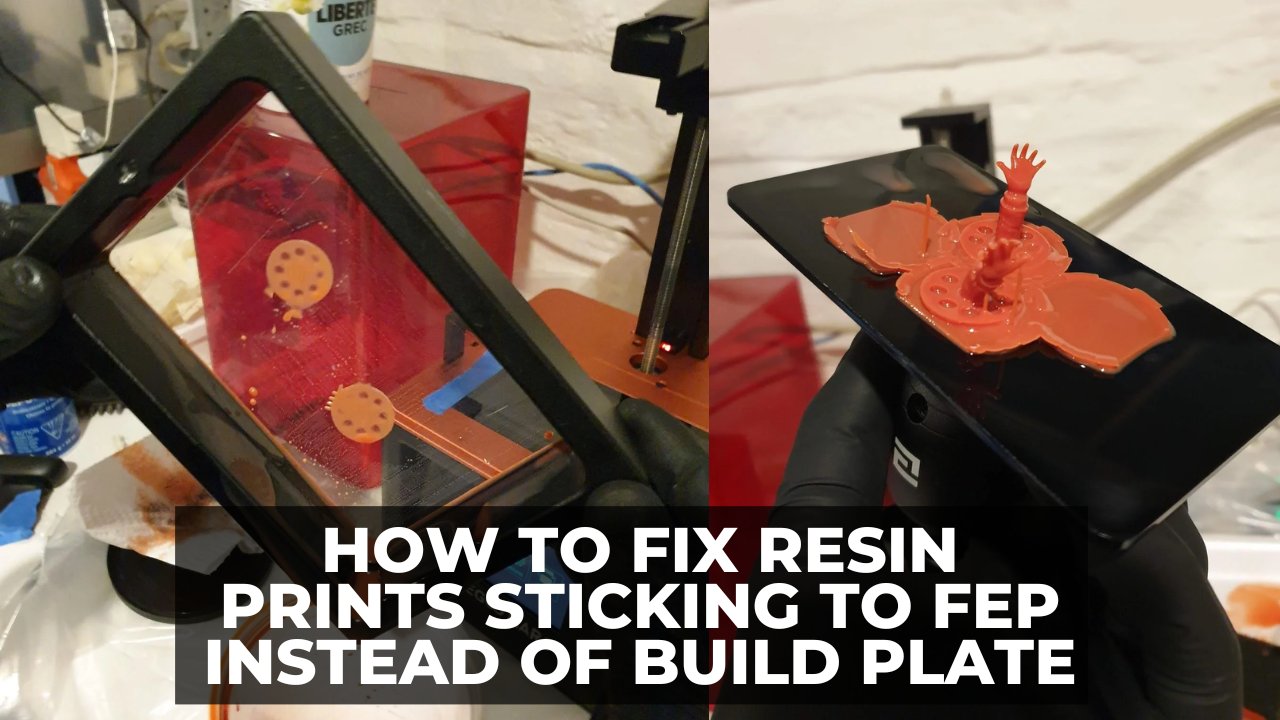
Just when you’re starting to have a good printing streak, your prints start sticking to the FEP film. It happens a lot, especially if your printing settings and build plate are slightly off.
Fortunately, it’s also easy to fix when you know the cause of the problem.
Let’s uncover the reasons why resin prints stick to the FEP film, and how you can quickly put this problem behind you.
Table Of Contents
- Why Do Resin Prints Stick to The FEP Film Instead of the Build Plate?
- Uneven or Unleveled Build Plate
- Low Bottom Layer Exposure Time
- Low Lifting Distance
- Fast Lifting Speed
- Insufficient Contact With Build Plate
- Loose FEP Sheet
- How To Stop Resin Prints Sticking To The FEP
- Even Out the Build Plate
- Level the Build Plate
- Increase Bottom Exposure Time
- Lower Lifting Speed
- Increase Lifting Distance
- Use Rafts
- Adjust FEP Sheet Tension
- How To Remove Stuck Resin From FEP & Dispose Of It
Why Do Resin Prints Stick to The FEP Film Instead of the Build Plate?
Uneven or Unleveled Build Plate
A 3D printer’s build plate needs to be even and leveled at all times. When it’s even, it’s uniformly flat, and when it’s leveled it’s completely parallel to the FEP film (and it should also be free from resin residue, dents, and scratches).

Anything short of that can create printing problems, including first-layer adhesion.
If parts of your first layer do not stick properly to the build plate, they’ll get left behind on the FEP film as the plate rises.
Low Bottom Layer Exposure Time
Exposure time is the amount of time the UV light hits the resin to turn it into a solid. The bottom layers of a print require more exposure time because they need to form a solid foundation to hold the entire print’s weight.
If the bottom layer exposure time is not enough, these layers won’t cure and stick firmly to the build plate. Eventually, the print will fall off and the build plate will repeatedly press it into your FEP sheet as printing continues.
Low Lifting Distance
Once a layer has cured, the build plate rises away from the FEP film by one layer height. This movement also allows new resin to flow into the gap where the last layer was printed, to prepare for the curing of a new layer.
The distance the build plate rises is the lifting distance. When this distance is low, the print will not detach from the FEP sheet. It also means that there won’t be room for the new resin to flow into what would be the new gap.
As the printing continues, the gap where resin is supposed to flow hardens and remains on the FEP sheet.
Fast Lifting Speed
Lifting speed is how fast the build plate pulls away a finished layer from the FEP sheet.
The faster the lifting speed, the greater the pulling force on a freshly cured layer, and the easier it is for this layer to peel away from the FEP film.
When the lifting speed is too fast, and the plate adhesion is not strong enough, the print can detach from the plate and remain on the FEP film during lifting.
Insufficient Contact With Build Plate
There are times when the contact between the print and the build plate is not enough. This can originate from slicing a model where some parts are thin and have narrow contact with the build plate. In such cases, the object will not stick to the build plate properly at these points.
Insufficient contact makes it easy for the print to yank away from the plate and remain on the surface of the FEP sheet as the plate rises.
Loose FEP Sheet
Sometimes, a print sticks to the FEP because the sheet is too loose. The FEP sheet stretches a little when pulled. If it is very loose, it will merely stretch along with the new layer still attached to it during the entire lifting distance.
The sheet, therefore, needs to be tight enough to resist the pulling force of the rising plate and allow a finished layer to go with the rest of the print.
How To Stop Resin Prints Sticking To The FEP
To prevent a resin print from sticking to the FEP film, use rafts and always print on an even and level bed. You should also have enough bottom exposure time, a tight FEP sheet, and the right lifting speed and lifting distance.
Let’s see how you can do this in detail.
Even Out the Build Plate
The first step to getting an even build plate is removing any leftover resin residue from previous projects. To do this:
- Unmount the build plate from the Z-arm of your printer.
- Using a metal scraper, gently scrape off any visible residue.
- To get a clean finish, pour some isopropyl alcohol on a clean, lint-free cloth and wipe the plate.
Minor scratches on the build plate are normal, especially because most of us scrape off our prints with sharp objects. But if the plate has deep scratches, dents, or grooves on it, these will require your attention.
A good way to eliminate them is using sandpaper to smoothen the plate.
Level the Build Plate
3D prints stick much better to a build plate that is leveled. To level a build plate on a resin 3D printer:
- Unmount the plate and ensure that it is clean.
- Place the plate back onto the printer, but keep its screws loose.
- If you have any resin in the resin tray, pour it back into the resin bottle using a funnel and filter paper.
- Clean out the resin tray by dabbing it with paper towels and rinsing it with isopropyl alcohol. Avoid pouring liquid residue down the drain.
- Attach the resin tray back to the printer and lower the build plate into the tray until the plate and FEP film makes complete contact.
- Tighten the build plate to keep it in its new leveled position.
Increase Bottom Exposure Time
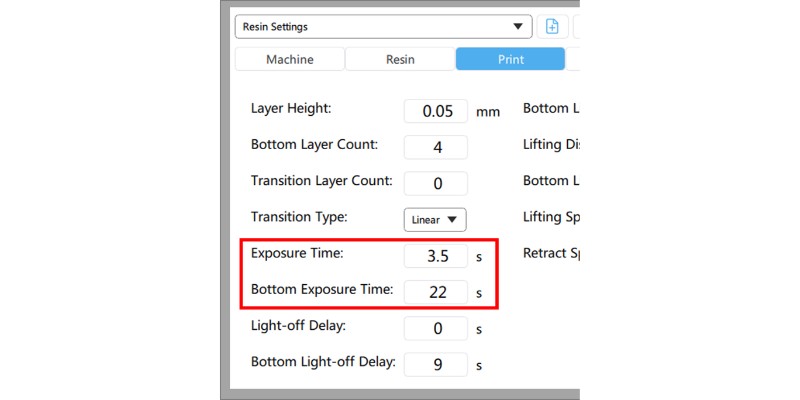
If the first layers of your prints are sticking to the FEP film, it could mean that they are not getting enough UV exposure time. Increase your bottom exposure time to make sure the resin in your first layers cures fully and sticks to the build plate.
Bottom exposure time is not set in stone. But a good range should be 8-12 times the normal exposure time for the print.
You don’t want to go overboard with this setting because too much of it can make it hard to remove the print, especially if you’re using strong 3D printer resin. Even worse, a bottom layer exposure time beyond 30 seconds can cause the printer to overheat.
Lower Lifting Speed
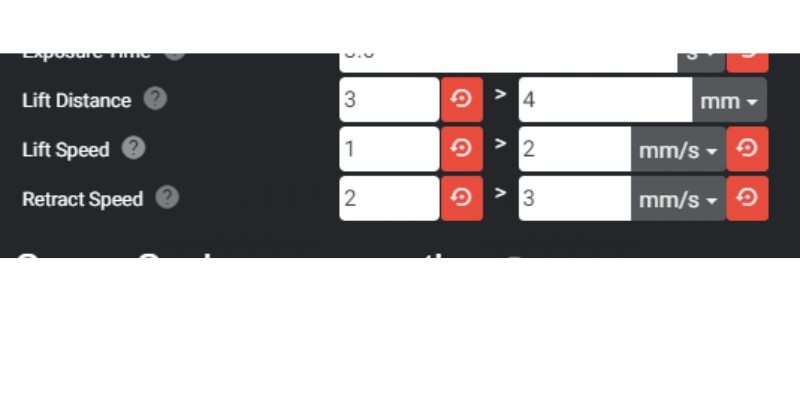
With lifting speed, you want to get a rate that allows newly cured layers to peel off the film while allowing the rest of the print to remain on the build plate. Keep in mind that as lifting speed lowers, printing time increases.
You can experiment with lifting speed until you find a sweet spot, but I find that 1-3 mm/s usually causes no problems.
Increase Lifting Distance
The lifting distance should allow the build plate to rise high enough to completely peel off a printed layer from the FEP film. You don’t want it to be too high because those extra millimeters will only take up more printing time.
6 mm is a common default lifting distance, but you can increase it up to about 8 mm if you’re dealing with large prints.
Use Rafts
A raft is a thin mesh of throwaway material on which your print sits. Before the printer prints a model, it can create a raft that sticks firmly to the build plate. This way, even if your model has thin contact point areas, they will attach to the raft that is sticking nicely and firmly onto the plate.
Some people feel that a raft is a waste of resin. However, if you’re constantly having blobs of resin stuck onto your FEP film, the benefits of a raft certainly outweigh the cons.
Most slicers have a raft feature that you can enable. You can also fine-tune what the raft will look like by tweaking these settings:
- Raft Margin: how far the raft extends around the model. Your raft should essentially be slightly bigger than your model.
- Raft Air Gap: the distance between the top layer of the raft and the bottom layer of the model. The greater the raft air gap, the less bonding you’ll have between your model and raft. Increasing this gap will make it easier to peel off the model from the raft, but keep in mind that the model still needs to stick sufficiently onto the raft.
Because you’re adding an extra part at the bottom, make sure that the Bottom Layers value includes the total number of layers in the raft plus a few extra layers for the bottom of the actual print. This will ensure that both the raft and the first layers of the print cure solidly.
If you are printing at a 0.05 mm layer height, try a raft layer height of 0.15 mm with 5 bottom layers. If you are printing at a 0.02 mm layer height, use a raft layer height of 0.08 mm with 6 bottom layers
Adjust FEP Sheet Tension
You need your FEP sheet to be taut enough and not overstretch as the build plate lifts off a printed layer. To adjust the FEP sheet tension:
- Take out the resin vat and turn it upside down.
- Using an Allen wrench, tighten the screws on the back of the FEP frame one by one.
- To check how tight the sheet is, lightly tap it with a finger or something soft. Avoid using any sharp or rough objects because these can put a dent in the film. As you tap on the film, it should sound similar to a snare drum.
- An indirect measure of tightness is the frequency of the sound the film makes as you tap on it. This frequency is measured in Hertz (Hz), and the higher the frequency, the tighter the tension in the sheet.
- A good spot is 325 Hz, which you measure using a frequency spectrum phone app such as Spectroid. This step will require alternation between tapping on the film, seeing the frequency it makes on the app, and loosening or tightening the screws until you get the required frequency.
How To Remove Stuck Resin From FEP & Dispose Of It
If you’ve successfully found a solution to the stuck resin, the next thing you want to do is remove and discard it safely. Because FEP sheets are prone to mechanical damage, it’s vital that you do this carefully.
How To Remove Stuck Resin From FEP Sheet
- Wear safety gloves and remove the resin tray from the printer.
- Pour any leftover resin back into the resin bottle to avoid wasting it. A funnel and thin paper filter will prevent any solid residues from getting into the bottle.
- Place the resin tray on top of a soft cloth and hold it in your hand.
- Use paper towels and gently dab any resin left in the tray.
- Once all the resin is out, locate a spot on the FEP sheet that has stuck resin. Apply some upward pressure using a finger directly under that spot.
- Scoop out the residue using a silicone spatula. Avoid using hard materials as you’re handing the FEP film. Repeat this for all the spots that have stuck resin.
- Rinse out the tray using some isopropyl alcohol, let it dry, and place it back into the printer.
If the stuck resin is too small to scoop out, consider using the FEP cleaning/tank cleaning function.
How To Dispose of Resin
Unlike FDM filaments, liquid resin requires extra care because it can be toxic to both the body and the environment. This also applies to eco-friendly and water-washable resin.
However, solid resin is not dangerous, so the best way to deal with used resin is first to let it cure. Never flash or pour liquid resin down the drain.
As you clean your tank, remember to put any rinsed-out resin and used paper towels into a separate container. When you’re done cleaning, put this container under direct sunlight to let it turn into a solid. After that, you can dispose of it with normal trash.


